Contents
exhaust header leak symptoms
An exhaust header leak typically doesn't paralyze a vehicle instantly; instead, it alerts the owner through a series of signals ranging from mild to severe. Accurately identifying these exhaust header leak symptoms is the critical first step in performing an exhaust header leak repair, helping you determine if you simply need to replace a gasket or the entire assembly.
1. Fluctuating "Ticking" Sound with RPM
This is the most recognizable symptom. As high-pressure exhaust gases spray out through tiny gaps, they create a rhythmic sound similar to metal tapping.
- Cold Start Characteristics: Symptoms are most prominent when the engine is cold. Because the metal has not yet expanded due to heat, cracks or flange gaps are at their widest. As the engine warms up, thermal expansion may temporarily "seal" some leak points, causing the noise to dampen.
- Distinction from Valve Noise: Many mistake this for valve lifter noise. The difference lies in the behavior: a header leak sound becomes significantly louder as the engine load increases (such as heavy acceleration or climbing), and the sound is positioned more toward the exhaust path on the side of the engine rather than the top of the cylinder head.
2. Sluggish Power Response and Fuel Economy Fluctuations
The exhaust system is not just an exit for fumes; it also influences intake efficiency through "Scavenging." A leak directly disrupts exhaust pulses, reducing cylinder air-exchange efficiency.
- Fuel Consumption Indicators: If your driving habits haven't changed, but your average fuel economy has dropped by 5%–10%, the front exhaust section should be your priority for inspection.
- ECU Logic: If the leak point is located upstream of the Oxygen Sensor (O2 Sensor), outside air can be sucked into the exhaust pipe, causing the sensor to read a false "lean" signal. To compensate, the ECU will over-inject fuel, leading to power lag, rough idling, and even triggering "too rich" or "too lean" mixture fault lights.
3. Visible "Crime Scenes": Soot and Cracks
Exhaust leaks often leave physical traces. Focus your inspection on the following areas:
- Black Soot (Soot): Observe the cylinder head connection flanges, weld seams, or the Collector area for black, smoke-like powder. This is the mark left by high-temperature exhaust carrying carbon particles.
- Physical Damage Characteristics:
- Cast Iron Manifolds: Often develop thermal fatigue cracks perpendicular to the airflow direction.
- Stainless Steel Headers: Check if the flanges are warped (Warping) or if the weld seams have cracked due to vibration. Seeing soot accompanied by fine cracks indicates the component has completely failed.
4. Interior Exhaust Odors and Safety Risks
This is the most direct—and most dangerous—signal of a severe leak.
- Odor Source: Exhaust fumes leaking into the engine bay can enter the cabin through firewall gaps or HVAC inlets; the smell is usually stronger when the heater is on.
- Carbon Monoxide (CO) Poisoning: This risk is highest in slow-moving traffic or while idling. If you feel unexplained dizziness or nausea while driving, it usually means the exhaust header has a severe leak and must be addressed immediately.
Root Causes: Cracks vs. Gaskets
Once you confirm the vehicle has abnormal noise or power loss, the next step is to pinpoint the fault precisely. For an exhaust header leak repair, problems generally fall into two categories: structural damage (cracks/warping) or seal failure (gaskets/bolts). While the symptoms are similar, the repair logic is entirely different.
1. Thermal Stress: The Primary Cause of Failure
Exhaust systems operate in extreme thermal cycles. Exhaust temperatures soar under high engine loads and cool rapidly after shutdown, causing repeated expansion and contraction that leads to metal fatigue.
- Cast Iron Manifolds: Commonly found in OEM parts. While heat-resistant, they are brittle. Long-term thermal stress accumulation easily leads to thermal fatigue cracks in thin areas.
- Stainless Steel Headers: Though they offer better performance, if the material is too thin or welding precision is insufficient, the flanges are prone to gradually warp (Warping) under high heat.
Pro Tip: Cast iron usually "cracks," while stainless steel usually "warps."
2. Loose Bolts: The "Catalyst" for Leaks
The exhaust system is not only subjected to heat but also endures intense engine vibration.
- The Vicious Cycle: Once exhaust header bolts loosen due to oxidation or improper torque, the flange clamping force drops. Exhaust gases will spray through tiny gaps at high velocity, eroding the edges of a perfectly good gasket until it is destroyed or burnt out.
- Diagnostic Focus: During repair, don't just look at the leak point; you must check for missing, broken, or stripped bolts. Ignoring these fundamental issues will cause a new gasket to blow out again in a short time.
3. Characteristics of Crack Failures (Cracks)
When the header body itself cracks, it usually signifies structural damage.
- Common Locations: Junctions between branch pipes and flanges, Collector weld seams, and the corner areas of cast iron parts.
- Recognition Signals: The noise is sharper, presenting as an exhaust "slapping" sound.
- Soot Distribution: Black smoke marks are not limited to the flange edges but may be scattered across the surface of the manifold body.
- Warm-up Behavior: Severe cracks will not disappear even after the metal expands from engine heat.
- Repair Advice: The long-term stability of welding cast iron is poor; replacing the assembly is usually recommended.
4. Characteristics of Gasket Failure (Gasket Failure)
This is the most common and most actionable type of repair.
- Recognition Signals: The leak location is precisely locked at the connection surface between the cylinder head and the flange.
- Soot Pattern: Black soot is concentrated around a specific exhaust port.
- Thermal Behavior: The noise is very loud when the engine is cold but noticeably decreases after warming up due to thermal expansion.
- Repair Core: As long as the body is not cracked and the flange is not deformed, a gasket replacement can perfectly solve the problem.
5. Quick Diagnostic Strategy: How to Differentiate?
By observing the soot and the location of the noise, you can quickly make a judgment:
- Check Soot Location: Edge soot $\rightarrow$ Gasket/Bolt issue; Body/Weld soot $\rightarrow$ Crack issue.
- Listen to Sound Changes: Significant reduction when hot $\rightarrow$ Gasket/Minor Flange Warp; Persistent sharp sound $\rightarrow$ Structural Crack.
- Physical Inspection Order: Observe soot $\rightarrow$ Listen for noise location $\rightarrow$ Check bolt tightness $\rightarrow$ Measure flange flatness after removal.
6. Choosing the Right Replacement: The Ultimate Fix for Recurring Leaks
If the original part is severely warped or frequently burns gaskets, it is better to replace it with a more logically designed component than to keep repairing it.
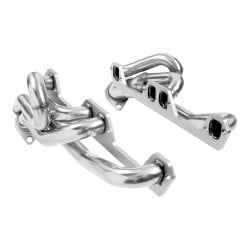
- For 5.2L/5.9L Engines: The OEM structure is complex and prone to leaks. We recommend the Zoncar Dodge Exhaust Header (No EGR), which reduces potential leak points by eliminating redundant EGR ports.
- For HEMI 5.7L Platforms: OEM manifold warping is a "common ailment." The KAX 300C 5.7L Hemi Header effectively solves recurring gasket issues and offers higher long-term maintenance value.
- For Vintage Ford/Mercury 6-Cylinders: To address aging cast iron with cracks, the Zoncar Ford Mercury 6-Cylinder Header repairs the fault while significantly boosting the exhaust efficiency of older vehicles.


Step-by-Step Exhaust Header Leak Repair: Options and Guide
Once you have accurately determined the source of the leak, the core strategy for a successful exhaust header leak repair is to assess the damage level before choosing a solution. This approach avoids over-repairing and prevents the "fix it and it leaks again" cycle.
1. Primary Repair: High-Heat Putty (For Minor Pinholes)
If the leak originates from very minor pinholes, sand holes, or tiny seepages near the Collector, high-heat exhaust putty can be used as an emergency treatment.
- Key Operations:
- Thorough Cleaning: After the exhaust pipe has cooled completely, use a wire brush to sand the leak point. You must remove all soot, rust, and paint, or the putty will not adhere.
- Pressure Curing: Press the putty evenly into the leak and wait for it to fully harden according to the product instructions (some require idling the engine to heat-cure, while others require air-drying).
- Limitations: This should only be viewed as a temporary solution. It cannot resolve structural issues like flange warping, blown gaskets, or loose bolts. As long as the underlying metal fatigue remains, this type of repair will eventually crack again.
2. Intermediate Repair: Gasket Replacement (For Flange Leaks)
If the leak is concentrated at the connection surface between the cylinder head and the header, and the header body itself is intact, then a gasket replacement is the most cost-effective solution.
- Key Steps:
- Chemical Penetration: Apply penetrating oil to the bolts at least 24 hours in advance. Exhaust bolts are in a state of high-temperature oxidation and are extremely prone to seizing or snapping. "Brute force disassembly" is the primary reason for DIY failure.
- Flatness Inspection: Once the header is removed, you must thoroughly scrape away all old gasket residue from both the cylinder head and the flange surface. Use a Straightedge to check if the flange plate is flat.
- Synchronized Hardware Replacement: It is recommended to replace old bolts with new exhaust header bolts. Many recurring leaks are caused by old bolts that have suffered heat-induced stretching and fatigue, leading to insufficient clamping force.
- Application: This is the ultimate solution for 90% of "Ticking" noises.
3. Advanced Repair: Welding Repair (For Stainless Steel Cracks)
When cracks appear on the header body, weld seams, or branch pipes, simply replacing the gasket will not help.
- Key Operations:
- This is only suitable for stainless steel materials. The stress concentration after welding cast iron manifolds is extremely high, leading to poor stability and secondary cracking.
- You must grind the cracked area down to bright silver metal, perform deep penetration welding, and inspect the surrounding area for stress propagation points.
- Decision Threshold: If the crack is located at a critical load-bearing point or the flange plate is already significantly warped, the labor cost of welding often exceeds the cost of directly replacing the part with a new assembly.
4. Repair Decision Framework: Which One Should You Choose?
To avoid ineffective operations, please refer to the following table for graded processing:
| Damage Level | Suggested Solution | Expected Outcome |
|---|---|---|
| Minor surface sand holes/pinholes | Use Exhaust Putty | Short-term temporary remedy |
| Abnormal noise/soot at the flange interface | Replace gasket + exhaust header bolts | Long-term thorough repair |
| Localized cracks in stainless steel body | Evaluate for Welding Repair | Depends on weld quality |
| Severe cracking / Warped flange / Multiple failed repairs | Direct Replacement of Header Assembly | Best long-term reliability |
5. When is Replacement Mandatory?
As mentioned in the diagnostic section, for certain models, replacement is more sensible than repair:
- 5.7L Hemi Engines: If the OEM manifold is warped and frequently burns gaskets, installing a KAX 300C Hemi Header solves the design defect once and for all.
- Dodge 5.2L/5.9L: If you are tired of EGR system leaks, swapping to a Zoncar Dodge Header simplifies the system and greatly improves future maintenance convenience.
Professional exhaust header gasket replacement: Standard Operating Procedure
Among all exhaust header leak repair options, replacing the sealing gasket is the most common and DIY-friendly project. Many seemingly severe leaks are rooted in gasket burnout or a drop in clamping force. As long as the header body has no cracks and the flange is not severely warped, a standardized exhaust header gasket replacement can make the exhaust system feel brand new.
1. Pre-Disassembly "Life-Saving" Prep: Penetrating Oil
Exhaust bolts live in a high-heat, oxidized environment. Forcing them off often leads to bolts snapping inside the cylinder head, turning a simple repair into an expensive engineering disaster.
- Professional Advice: Apply Penetrating Oil to all fasteners at least 24 hours before starting the job.
- Operation Logic: Use a "Spray—Sit—Re-spray" cycle. If you feel excessive resistance during removal, follow a "loosen half a turn, back off a quarter turn" rhythm. This back-and-forth motion helps release the rust stress between the threads.
2. Reading the Old Gasket: Hidden Diagnostic Clues
Do not rush to throw away the old gasket after removal; it is your best "diagnostic manual":
- Localized Blow-by: If severe erosion is visible around one specific exhaust port, it indicates insufficient clamping force at that position or a localized flange warp.
- Erosion Marks: Check the edges of the cylinder head exhaust ports. If the leak persisted for too long, the high-velocity gases might have eroded the metal surface of the head itself. In such cases, simply replacing the gasket may not stop the leak.
3. Surface Preparation: The Foundation of Sealing Success
"Cleanliness determines the seal." No matter how high-quality the gasket is, if the mating surfaces are uneven, leakage is only a matter of time.
- Steps: Use a scraper to carefully remove old gasket residue, then use a wire brush or fine sandpaper to polish the surface.
- Standard: The final surface should be free of carbon deposits and residue. When checked with a Straightedge, there should be no visible light gaps.
- Note: Use Brake Cleaner to remove residual oil, ensuring the new gasket is compressed onto a pure metal surface.
4. Material Selection: MLS vs. Composite Gaskets
Choosing the right exhaust header gasket replacement material depends on the condition of your flanges:
| Gasket Type | Core Advantages | Best Scenario |
|---|---|---|
| Multi-Layer Steel (MLS) | Excellent heat and blow-by resistance; extremely long lifespan. | High-precision aftermarket headers with strong flange rigidity. |
| Composite Gasket | Soft, high compressibility, and high tolerance for minor irregularities. | OEM replacements, high-mileage vehicles, or surfaces with minor imperfections. |
5. Installation Logic: Sequence Over Strength
To prevent secondary warping of the header flange, uniform pressure is key:
- Bolt Treatment: We recommend using new bolts and applying a thin layer of Anti-seize to the threads.
- Tightening Path: You must follow a cross-pattern sequence starting from the center and working outwards. Hand-tighten all bolts first, then tighten them in 2–3 progressive stages using a torque wrench.
6. The Final Step: Re-torque After a Heat Cycle
This is the step most DIYers skip. After the exhaust system experiences several "Heat—Cool" cycles, the new gasket undergoes slight compression settling, and the bolt clamping force will drop.
Standard Procedure: Re-check the torque of all exhaust header bolts after driving 50–100 miles. This single step solves 80% of "leaks that return after a few days."
The Vital Role of exhaust header bolts
In many exhaust header leak repair cases, the factor determining success isn't the gasket, but the exhaust header bolts. These fasteners must simultaneously combat extreme temperatures, high-frequency vibration, and corrosion. Once a bolt fails, even the most expensive header will quickly develop a leak.
Recommended Torque Reference Table
For common exhaust header installations, the following general reference values for exhaust header torque specs are widely adopted:
| Bolt Specification | Recommended Torque Range | Notes |
|---|---|---|
| 5/16" Bolts | 15–18 ft-lbs | Commonly used for smaller fixing points; tighten in progressive stages. |
| 3/8" Bolts | 20–25 ft-lbs | Standard for most V8/I6 header and manifold installations. |
1. Why are OEM Exhaust Bolts So "Fragile"?
Exhaust manifold bolts live in the hottest zone of the engine bay. Frequent Heat Cycles (expanding and contracting) change the physical properties of the metal, leading to:
- Metal Fatigue & Stretching: Under high heat, bolts can undergo minor permanent elongation, causing them to lose their original clamping force and triggering gasket blow-by.
- Oxidation Seizing (Galling): Thread surfaces oxidize at high temperatures and bond with the cylinder head metal. This is the primary reason for bolts snapping during removal.
- Embrittlement: Long-term heat exposure makes the metal brittle. On older vehicles, even slight external force can twist the bolt head off.
2. Upgrade Advice: Grade, Material, and Selection
When performing an exhaust header gasket replacement, it is strongly recommended not to reuse old bolts. Upgrading your hardware is the best investment against future leaks:
- Strength Grade: Choose at least Grade 8 or higher carbon steel bolts, as they provide more stable pre-load tension.
- Stainless Steel Bolts: These offer superior corrosion resistance, performing excellently in coastal or salt-heavy regions. Caution: You must use anti-seize during installation to prevent "cold welding" effects that make future removal impossible.
- Spec Matching: Ensure the new bolts match the cylinder head's length and Thread Pitch exactly. Bolts that are too long or too short will result in fastening failure.
3. Anti-Loosening Techniques: Say Goodbye to Recurring Leaks
Due to high-frequency vibrations from exhaust pulses, bolts are prone to backing out. Use these three advanced techniques:
- Thin-Coat Anti-Seize: Apply a small amount of copper-based or nickel-based anti-seize to the front of the threads. This prevents future snapping and ensures more accurate torque readings.
- Locking Hardware: Consider using serrated Flanged Bolts or professional split Lock Washers.
- Stage 8 Locking Systems: For high-performance or racing vehicles, use Stage 8 Locking Fasteners with locking tabs to physically prevent the bolt from rotating.
Core Summary: The Symbiotic Relationship between Bolts and Gaskets
Remember: The gasket is only the sealing material; the exhaust header bolts are the source of the sealing pressure.
- If you are installing a Zoncar Header on a 1992-2004 Dodge engine, always use a fresh set of high-strength bolts.
- When installing a KAX Chrysler 300C Header, proper bolt pre-load is the only insurance against the flange warping again.
Common Mistakes in Exhaust Header Repair
Many repeat leaks aren't due to part quality, but rather overlooked details during the process. Avoiding these 7 high-frequency errors will ensure your exhaust header leak repair is truly permanent.
- Working on a Hot Engine: Attempting removal while the engine is hot leads to stripped threads or galling. Metal is in an expanded state, making torque readings inaccurate. Professional Advice: Always wait for a complete cold-soak.
- Skipping Penetrating Oil: Forcing a rusted bolt is a recipe for a broken stud. Patience saves hours of drilling later.
- Incomplete Surface Cleaning: Failing to scrape down to bare metal or leaving carbon deposits ensures the new gasket will fail during initial heat cycles.
- Ignoring Flange Flatness: If the Warping is severe, no gasket can bridge that gap forever. Always check with a straightedge before reassembly.
- Tightening by "Feel": Guessing torque leads to uneven pressure. Always use a calibrated torque wrench to meet exhaust header torque specs.
- Incorrect Tightening Sequence: Going in a straight line from one end to the other warps the flange. Use the center-out cross pattern.
- Missing the Re-Torque: Thermal expansion causes the gasket to settle. Skipping the 50–100 mile check is the #1 cause of "two-week leaks."
Conclusion
A successful exhaust header leak repair is the result of accurate diagnosis, quality hardware, and mechanical patience. From identifying the first "ticking" sound to the final re-torque, every detail determines the longevity of the seal.
If your factory manifold is chronically warped or cracked, stop wasting money on temporary fixes. Upgrading to a more robust replacement—like the KAX 300C Hemi Header or a Zoncar Dodge Header —is the most reliable path to a quiet and efficient engine.