Contents
- Exhaust Manifold Introduction
- What is an Exhaust Manifold?
- The Science Behind Exhaust Manifolds
- How Hot Does an Exhaust Manifold Get?
- Detection and Diagnosis of Exhaust Manifold Leaks
- Repairing an Exhaust Manifold Leak
- The Consequences of Ignoring Exhaust Manifold Leaks
- Cracked Exhaust Manifolds: Causes and Solutions
- Dealing with Broken Exhaust Manifold Bolts
- Exhaust Manifold Gasket Replacement
- Upgrading Your Exhaust Manifold: Performance Benefits
- Exhaust Manifold Repair vs. Replacement: Which is Right for You?
- Frequently Asked Questions (FAQs)
Exhaust Manifold Introduction
The exhaust manifold plays a critical but often overlooked role in the performance and efficiency of your car's engine. Acting as the starting point for the exhaust system, the manifold channels hot gases from the cylinders to the catalytic converter and muffler. Its design and construction impact exhaust gas flow, engine tuning, emissions, and power output.
Understanding exhaust manifold function allows you to optimize engine performance, diagnose exhaust system issues, and make informed repair decisions. This guide explores manifold anatomy, operating temperatures, leak diagnoses, upgrade options, and answers frequently asked questions. Read on to unlock the secrets behind this vital engine component.
The Crucial Role of the Exhaust Manifold
The exhaust manifold gathers exhaust fumes from the engine cylinders and channels them to a single outlet. The header design enables tuned length tubes that capture pulses for scavenging. This enhances cylinder filling, engine efficiency, and power.
Proper manifold design reduces backpressure that restricts the flow of exhaust gases. Lower backpressure enables smoother evacuation of gases resulting in optimal fuel burn and better performance.
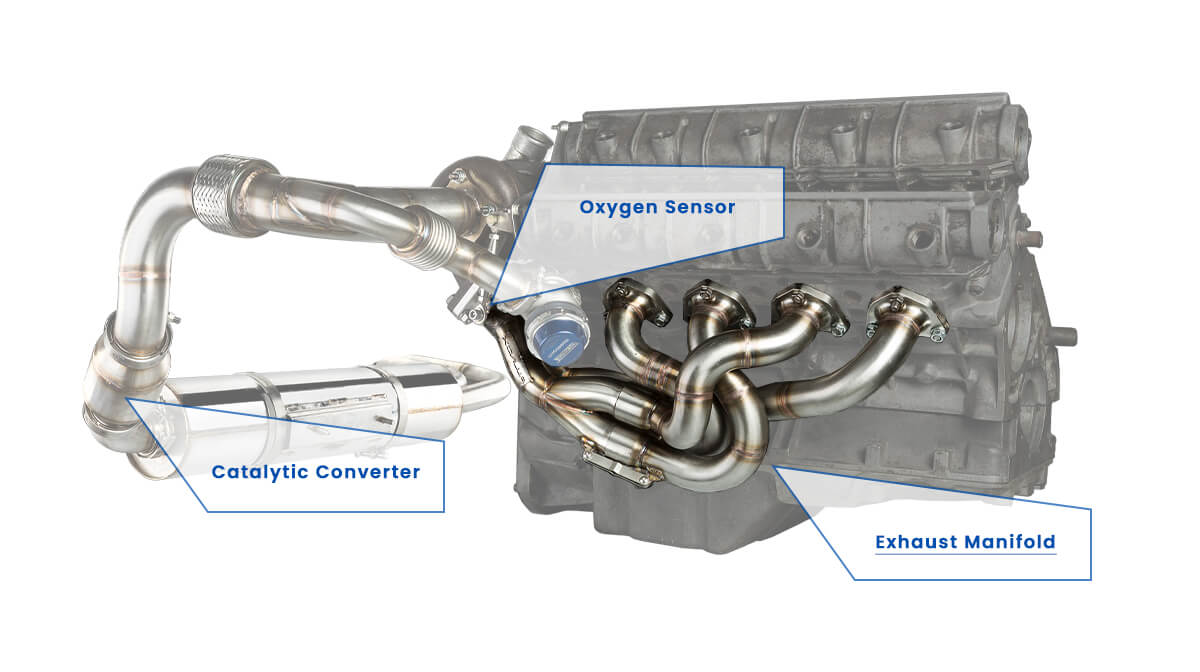
Understanding the Anatomy of the Exhaust System
The exhaust manifold links to the catalytic converter, resonator, muffler, and tailpipe. This system controls emissions, reduces noise levels, and expels gases. Exhaust system parts must be accurately sealed to contain gases and prevent leaks. Leaking exhaust manifold can cause poor engine performance, high emissions, and damage.

What is an Exhaust Manifold?
Definition and Function
The exhaust manifold is an engine component that routes exhaust gases from the cylinders into one outlet. Its key functions include:
- 1. Directing hot gases away from the engine
- 2. Delivering emissions to catalytic converters
- 3. Improving scavenging via tuned header tubes
- 4. Reducing backpressure for smoother exhaust flow
Proper manifold design minimizes residual gas while harnessing pressure pulses for better cylinder filling and evacuation. This optimizes fuel burn for more power.
Types of Exhaust Manifolds
There are two main types of manifolds:
Cast Iron ManifoldsCast iron manifolds have integrated outlets in log, ram horn, or center dump styles. They withstand high temperatures but are heavy and limit exhaust flow.
Tubular Manifolds (Headers)Tubular manifolds consist of individual tubes joined at a collector. Larger diameter in the tubular manifolds improves both flow and performance. Stainless steel due to its resistance to corrosion and thermal stress, Commonly used in tubular manifolds and performance modifications.
The Science Behind Exhaust Manifolds
How Exhaust Manifolds Improve Engine Performance
Several factors allow exhaust manifolds to enhance engine performance:
- 1. Smooth exhaust flow from large diameter tubes
- 2. Tuned length tubes harness pressure pulses for better cylinder scavenging
- 3. Reduced backpressure decreases pumping losses
- 4. Directed exhaust gas flow improves evacuation
Together this improves fuel efficiency, optimizes burn, and increases usable power.
Gas Flow Dynamics and Its Impact on Efficiency
Manifold design leverages fluid dynamics for better flow. Controlling wave propagation timing and amplitude between pulses utilizes pressure to fill cylinders and evacuate exhaust.
Minimizing backpressure reduces the engine's work in pushing out gases. This frees up energy to be converted into usable horsepower and torque.
How Hot Does an Exhaust Manifold Get?
Exhaust manifolds endure intense heat from high-temperature exhaust gases. Operating temperatures typically range from 500-1000°F. Thermal expansion and contraction cycles strain the manifold. Cracks and leaks can result from these high temperatures and thermal stress over time.Detection and Diagnosis of Exhaust Manifold Leaks
Exhaust Manifold Leak Symptoms
Indications of a manifold leak may include:
- 1. Unusual engine noises, such as hissing or tapping sounds
- 2. Reduced engine performance and power.
- 3. Unpleasant exhaust odor inside the vehicle.
- 4. These indicate gas is escaping before the catalytic converter due to a compromised manifold seal.
Performing a visual inspection.
Inspect the manifold surface for rust, damage, or holes. Examine gasket surfaces leaks, spray the area with soapy water and observe the formation of bubbles.
Using diagnostic tools.
An exhaust gas leak can be identified with a hydrocarbon leak detector. OBD scanners also detect manifold leak fault codes that activate the check engine light.
Common Causes of Exhaust Manifold Leaks
Thermal Expansion and Contraction - Repeated hot-cold cycles weaken the manifold material over time, leading to cracks that leak exhaust gases.
Corrosion and Rust - Prolonged exposure to moisture and road salts causes external corrosion and rust. Internally, condensation and hot gases create oxidation.
Gasket and Seal Deterioration - Failed or damaged exhaust manifold gaskets provide a path for exhaust to escape. Hardening, wear, and improper installation can cause this.
Repairing an Exhaust Manifold Leak
Temporary Fixes vs Permanent Solutions
Adding sealant temporarily plugs small manifold leaks, but it's not a permanent solution. For robust repairs, the manifold must be replaced or welded. Only use sealants as an emergency fix until proper repairs can be made.
Step-by-Step Guide to DIY Repair
Repairing a manifold leak involves:- Step 1. Gather required tools and materials - socket set, wrenches, pry bar, gasket, sealant, eye protection, gloves, etc.
- Step 2. Removing the exhaust manifold - Disconnect components and retaining bolts. Carefully separate the manifold.
- Step 3. Cleaning and preparing the surface - Thoroughly scrape and clean mating surfaces.
- Step 4. Installing a new exhaust manifold gasket - Use a torque wrench to properly tighten bolts.
- Step 5. Reattaching the exhaust manifold - Reconnect all components and fittings.
Seeking Professional Assistance
Manifold replacements and welding repairs require special tools and skills. For the best results, have your manifold repaired by a certified technician.
The Consequences of Ignoring Exhaust Manifold Leaks
A leaking manifold causes an increase in levels of raw hydrocarbons and carbon monoxide. Leaks in the exhaust system can significantly reduce the lifespan of expensive catalytic converters and oxygen sensors, causing them damage. Leaking gases also reduce the scavenging in cylinders. This reduction results in reduced engine power, fuel economy, and responsiveness. Unburned fuel has the potential to ignite in the exhaust system.
Cracked Exhaust Manifolds: Causes and Solutions
Identifying Cracks and Their Locations
Inspect thoroughly for external cracks and leakage marks. Common locations include the welds, joints, outlets, and surface.
Repairing, Welding and Replacement
Very small cracks and fractures can temporarily be repaired via epoxy sealants or carbon fiber banding. Minor cracks can be rewelded but eventually, replacement is needed for a lasting repair. Weigh costs carefully when deciding between welding and replacement.
Dealing with Broken Exhaust Manifold Bolts
1. Symptoms of Broken BoltsDifficulty removing retaining bolts, missing bolt heads, exhaust leaks near flanges, and strange noises all indicate broken manifold bolts.
2. Removing Broken Bolts SafelyAvoid amateur bolt extraction attempts. Instead, have a professional remove broken bolts to minimize damage risk. Specialized tools and skills are required.
3. Replacing Bolts and Proper TorqueingAlways install new manifold bolts when performing repairs. Torque bolts to specifications using a calibrated torque wrench.
Exhaust Manifold Gasket Replacement
1. Importance of Gaskets in the Exhaust SystemGaskets seal and prevent leaks where components join. A failed manifold gasket compromises performance and allows harmful gas entry into the vehicle.
2. Signs of a Failing GasketBlowby, unusual exhaust smells in the cabin, leaks near the manifold, power loss, and odd noises all indicate gasket failure.
Step-by-Step Exhaust Manifold Gasket Replacement Guide
Replacing an exhaust manifold gasket is an involved but straightforward DIY repair if you have the necessary mechanical skills and tools. Follow these steps closely:
- Step 1. Allow the engine to fully cool before starting. Disconnect the negative battery terminal.
- Step 2. Loosen and remove any components blocking access to the exhaust manifold, such as the air filter housing.
- Step 3. Spray penetrating oil on the manifold bolt heads and let it soak for 10-15 minutes.
- Step 4. Using a wrench or socket set, loosen and remove the manifold bolts. Caution - exhaust manifold bolts are prone to seizing and snapping. Take care not to round off the heads.
- Step 5. Check for any remaining hoses or sensors connected to the manifold and detach them.
- Step 6. Carefully separate the manifold from the cylinder head surface. Inspect the sealing surfaces for any damage.
- Step 7. Using a putty knife or razor blade, gently scrape away any remaining gasket material from the cylinder head and manifold. Be careful not to gouge the sealing surfaces.
- Step 8. Thoroughly clean the cylinder head and manifold surfaces with brake parts cleaner or a gasket remover spray. Wipe down with a clean rag until no residue remains.
- Step 9. Check the new gasket orientation and confirm it matches the original. Apply a small bead of high-temp RTV sealant if specified by the instructions.
- Step 10. Carefully seat the new exhaust manifold gasket in place, aligning all bolt holes.
- Step 11. Reinstall the manifold using new OEM bolts if possible. Snug down bolts in a crisscross pattern.
- Step 12. Using a calibrated torque wrench, torque the manifold bolts to the vehicle manufacturer's specs in the specified sequence.
- Step 13. Reconnect all sensors, hoses, and components that were detached from the manifold area.
- Step 14. Reconnect the battery and start the engine, checking for any leaks after coming up to operating temperature.
- Step 15. Allow sealant to fully cure before high-load operation. Check torque again after the first road test.
- Step 16. Carefully following these exhaust manifold gasket replacement steps will ensure a successful, leak-free repair. Let the vehicle’s engine fully cool before starting, work methodically, and torque bolts to spec.
Upgrading Your Exhaust Manifold: Performance Benefits
Enhanced Exhaust Gas Flow
Aftermarket tubular manifolds have larger diameter tubes to significantly improve exhaust flow and velocity compared to cast iron stock manifolds.
Power and Torque Gains
Reduced backpressure and improved scavenging effect from performance manifolds boost usable power and torque throughout the rev range. Gains of 10-25 hp are common.
Choosing the Right Aftermarket Manifold
Select a manifold matched to your engine, power goals, and budget. Stainless steel and ceramic coated options provide durability for high performance builds. Custom one-off fabrications offer ultimate fitment.
Exhaust Manifold Repair vs. Replacement: Which is Right for You?
Factors Influencing the Decision
Consider the repair cost, replacement cost, labor time, drivability impact, longevity of the repair, and your restoration goals.
Cost Considerations
Replacing a manifold can run $200-$1000 for OEM and aftermarket units. Welding or epoxy repairs average $150-$300. Factor in labor costs as well.
Long-Term Performance and Durability
Repairs may be temporary. New OEM or performance manifolds often prove to be better long-term investments over repairing severely damaged factory manifolds.
Conclusion
The exhaust manifold is the gateway for engine efficiency, performance, and emissions control. With diligent maintenance and proper repairs when needed, your vehicle’s exhaust manifold will keep your engine running smoothly for years to come. Its condition and compatibility impact the entire exhaust system.
Frequently Asked Questions (FAQs)
Q: What is the purpose of an exhaust manifold?
A: To collect and direct exhaust gases from the cylinders into one stream while utilizing pressure wave tuning for scavenging. This improves engine efficiency and performance.
Q: Can I drive with a cracked exhaust manifold?
A: It's not recommended. Cracked manifolds risk further damage to your engine, emissions controls, and could leak harmful CO into the cabin. Have it repaired promptly.
Q: How do I know if my exhaust manifold is leaking?
A: Listen for hissing noises near the manifold. Also watch for symptoms like power loss, unusual smells in the cabin, and exhaust leaks around the manifold surface.
Q: Are aftermarket exhaust manifolds worth the investment?
A: They can be, for added power and durability. But ensure the manifold matches your engine and goals. Custom fabrication offers the best fitment and performance.
Q: How often should I inspect my exhaust manifold for leaks?
A: Inspect your exhaust components for any sign of leaks or damage during every oil change, and immediately check if you notice any unusual symptoms.
Q: What are the signs of a failing exhaust manifold gasket?
A: Blowby, exhaust smells in the cabin, visible exhaust leaks between the manifold and head, abnormal noises, and surging idle all point to a blown manifold gasket.
Q: Can a DIY repair fix an exhaust manifold leak permanently?
A: Minor leaks can possibly be fixed through DIY gasket replacement. But severe manifold damage requires professional welding or replacement for a lasting repair.
Q: What tools do I need to replace an exhaust manifold?
A: Basic hand tools, a socket set, torque wrench, pry bar, replacement gasket, penetrating oil, and safety gear like eye protection, gloves, and jack stands.
Q: Is a leaking exhaust manifold harmful to the environment?
A: Yes. Exhaust leaks bypass emissions controls leading to increased hydrocarbon, NOx and CO emissions entering the atmosphere.
Q: Are there performance benefits to upgrading my exhaust manifold?
A: Definitely. Aftermarket tubular manifolds significantly reduce backpressure and improve scavenging for more power, torque, and efficiency.
Q: How does an exhaust manifold affect fuel efficiency?
A: Improper manifold design creates backpressure that makes the engine work harder, wasting fuel. Efficient manifolds optimize gas flow, reducing fuel waste.
Q: Can I prevent exhaust manifold issues through regular maintenance?
A: Yes. Routinely checking for leaks and damage, addressing any engine issues promptly, and using quality components will help prevent many exhaust manifold problems.
Q: Is a stainless steel exhaust manifold better than a cast iron one?
A: Generally yes, stainless steel is more durable and resistant to cracking, rust, and corrosion. It also offers better high-temperature longevity.
Q: What is the average cost of repairing an exhaust manifold leak?
A: The typical cost to repair a leaking exhaust manifold is $150-$350 if the leak is accessible and no major damage exists. Full manifold replacement averages $300-$1,000 or more.
Q: Can a damaged exhaust manifold lead to engine misfires?
A: Yes, exhaust leaks decrease cylinder scavenging effects which can cause significant engine misfires, especially under load.
Q: How do I choose the right exhaust manifold for my vehicle?
A: Find a manifold designed specifically to fit your vehicle make, model, year, and engine. Confirm it matches all ports, sensors, bolts, and steering/chassis components.
Q: Is a leaking exhaust manifold repair covered under warranty?
A: If within the powertrain warranty period, exhaust manifold leaks and damage are often covered repairs, depending on the manufacturer's policies.