Contents
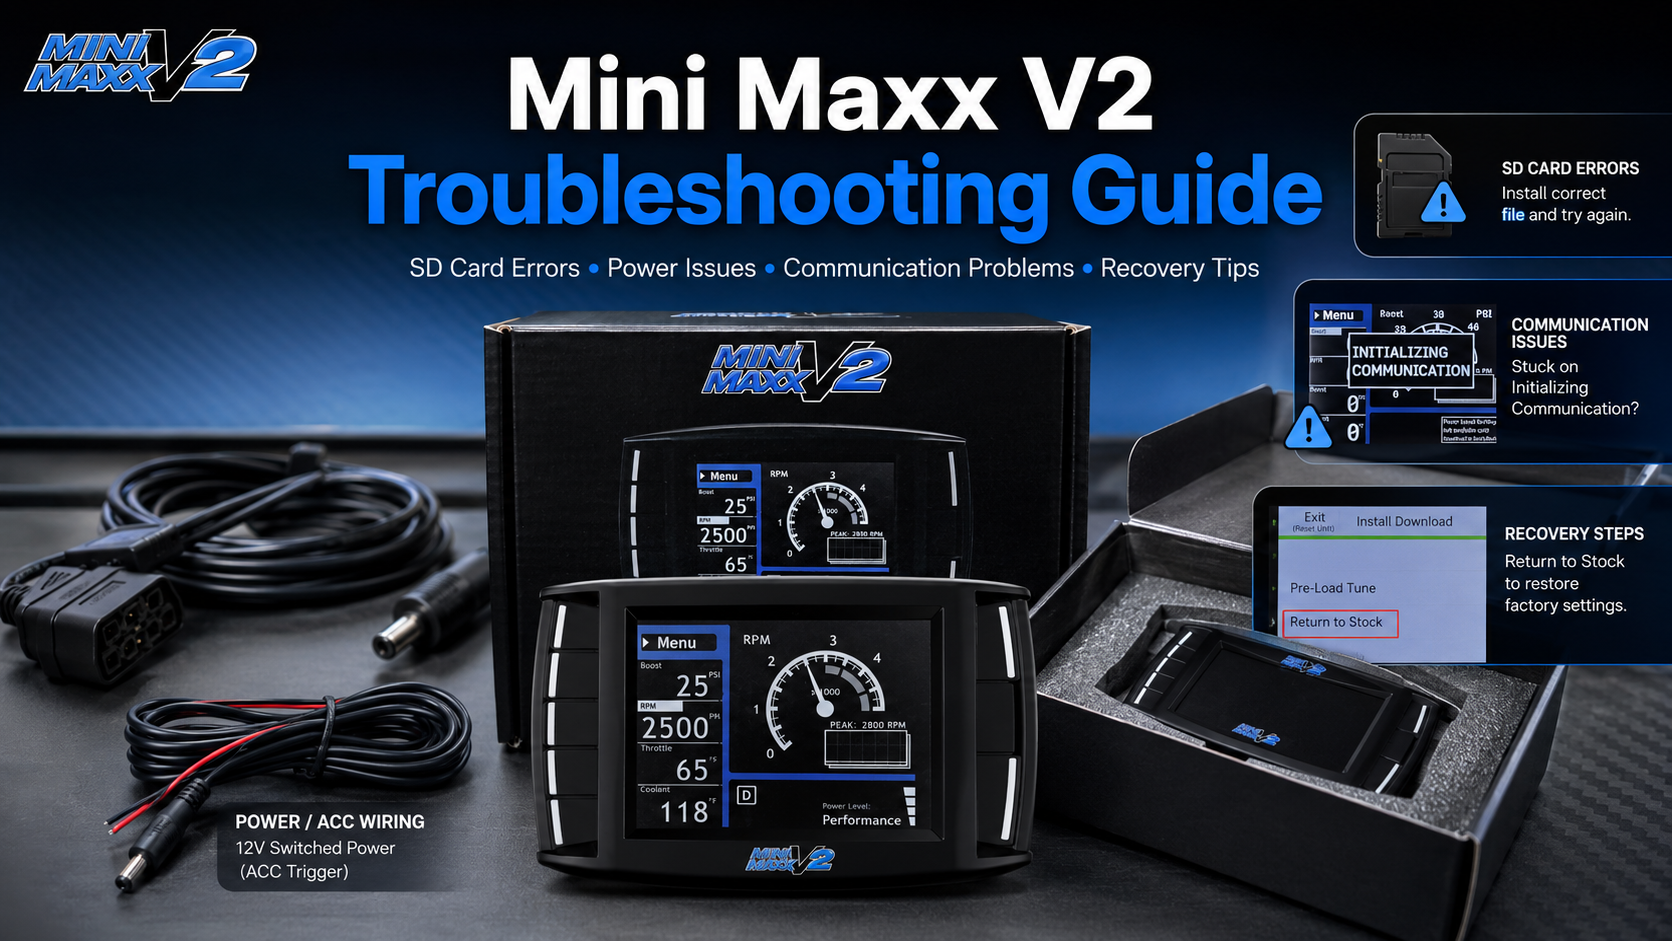
- 1. SD Card Errors: “Missing SD Card” or “Unable to Open File”?
- 2. Troubleshooting Mini Maxx V2 Hardware: How to Fix Black, White, or Frozen Screens
- 3. Mini Maxx V2 Power Sync: Using the 12V Switched Power Wire (ACC) for Auto On/Off
- 4. Stuck on “Initializing Communication”? How to Rescue Your Tuner Connection
- 5. What to Do if You Accidentally Turn Off the Key During Installation?
- 6. When to Stop Troubleshooting: Return & Warranty Standards
- 7.Summary
- FAQs
As one of the most widely used diesel tuner options in the truck performance market, the Mini Maxx V2 has earned a strong following among diesel owners thanks to its practical tuning support, familiar interface, and competitive price. Whether you are working with a 6.7L Cummins, a 6.7L Powerstroke, or another supported diesel platform, this car tuner can occasionally run into problems during installation, setup, or daily use.
This guide covers the most common Mini Maxx V2 issues, including “Missing SD Card”, “Unable to Open File”, black screen, white screen, frozen display, power sync problems, “Initializing Communication” errors, interrupted flashing, four-digit error codes, and limp mode. You will also find practical troubleshooting steps and technician-style tips that are often not explained clearly in basic instruction sheets.
Compliance note: Some tuning functions and emissions-related components may be restricted or illegal for street use in certain areas. Always verify your local, state, and federal regulations before purchasing, installing, or using any emissions-related diesel tune, delete hardware, or performance calibration.
1. SD Card Errors: “Missing SD Card” or “Unable to Open File”?
When using the Mini Maxx V2 to install a diesel tune, the SD card acts like the tuner’s “brain.” It stores the files the device needs to load the interface, identify the truck, and start the tuning process. If the tuner cannot read the card, the installation may fail before it even begins.
Many users assume the tuner itself is damaged when they see an SD card error. In reality, most SD card-related problems are caused by file placement, formatting, card size, or an incorrect volume label.
Typical Symptoms
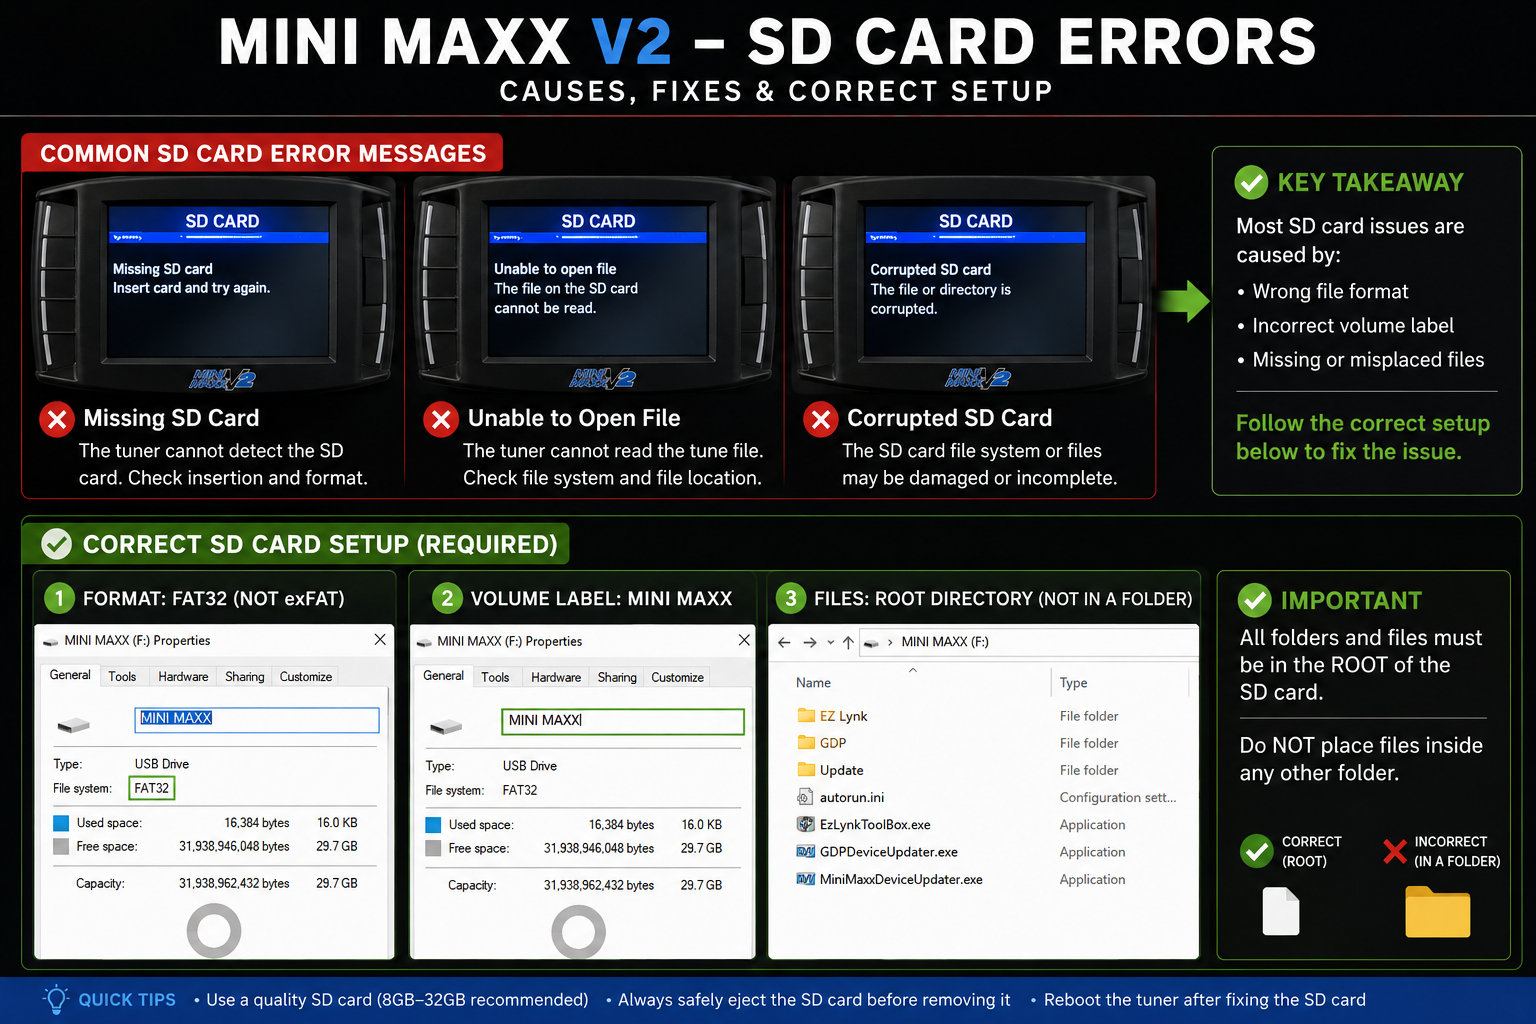
- The Mini Maxx V2 screen displays “Missing SD Card.”
- The tuner shows “Error: Unable to open file FO08.txt” or another .txt, .bin, or system file error.
- The tuning progress bar freezes and the device reports a file read failure.
- The tuner powers on, but certain menus or vehicle files will not load.
Deep Diagnosis
SD card issues are usually caused by three small but critical details:
- Incorrect file hierarchy: The required program files must be placed directly in the SD card’s root directory. In simple terms, when you open the SD card on your computer, you should immediately see folders such as SYSTEM and CUSTOM, along with the required tuning files. If these files are hidden inside another folder, the tuner may not find them.
- Incorrect volume label: This is one of the easiest details to miss. When the SD card is formatted on a computer, the volume label should be named MINI MAXX. It must be in uppercase, and there must be one space between “MINI” and “MAXX.”
- Unsupported file format: The Mini Maxx V2 is designed to read FAT-formatted cards. If you use a card larger than 32GB, your computer may format it as exFAT by default. The tuner may not recognize exFAT correctly.
Step-by-Step Fix
- Check file integrity. Confirm that the Mini Maxx V2 software package is complete. If the program package looks incomplete, unusually small, or corrupted, download a fresh copy before continuing.
- Back up and reformat the SD card. Save a backup copy of the card files to your computer. Then format the SD card as FAT and set the volume label to MINI MAXX.
- Verify the root directory. Open the SD card after copying the files back. Make sure the required folders and files are displayed directly on the first screen of the card, not buried inside another folder.
Pro Tip: If the original SD card keeps causing errors, replace it with a name-brand Class 10 microSD card (2-8GB). A 4GB card is usually a safer choice than a larger card. A stable, correctly formatted card can greatly improve file reading reliability for this car tuner.
2. Troubleshooting Mini Maxx V2 Hardware: How to Fix Black, White, or Frozen Screens
Before installing any software, loading a tune, or changing vehicle settings, the Mini Maxx V2 must power on and display information correctly. If you see a black screen, white screen, glitch screen, or frozen display, the issue is usually related to power supply, OBD connection, adapter box condition, or basic hardware communication.
Typical Hardware Failures
- No power: After connecting the OBD cable, the screen stays completely dark. There is no backlight, no startup sound, and no visible response.
- White screen or glitch screen: The screen lights up, but it stays pure white, displays colored lines, or cannot enter the normal menu.
- Boot looping: The tuner powers on for a few seconds, shuts off, and then repeats the same cycle.
- Frozen display: The screen turns on but does not respond to button input or remains stuck on one page.
In-Depth Diagnosis
- Fuse and OBD pin problems: The Mini Maxx V2 OBD adapter box includes a protective fuse. If the vehicle experienced a voltage surge during jump-starting, battery replacement, or unstable electrical conditions, the fuse may blow. Also inspect the vehicle’s OBD II port. Pin 16 supplies power, while Pins 4 and 5 provide ground. If these pins are corroded, bent, loose, or pushed back, the tuner may stay black.
- Low voltage threshold: This car tuner can be sensitive to weak battery voltage. If the battery is sitting around 11V to 11.5V, the screen may have enough power to light the backlight, but not enough to load the firmware and interface correctly. This can result in a white screen or repeated restart.
- Corrupted firmware or display files: In rare cases, a white screen may be caused by damaged display driver files or corrupted system files on the SD card. This is why SD card condition and file structure should be checked before assuming the tuner is physically damaged.
Step-by-Step Hardware Fix
Step 1: Verify the Main Tuner Unit
Disconnect the tuner from the vehicle. Use a high-quality Mini USB cable to connect the Mini Maxx V2 head unit directly to a computer. If the screen works normally when connected to the computer, the main tuner unit is likely healthy. The issue is more likely related to the OBD cable, adapter box, vehicle port, or vehicle-side power.
If the tuner still shows a black screen or white screen when connected directly to the computer, the problem may be an internal screen ribbon cable, damaged display, or internal circuit board fault.
Step 2: Check the OBD Adapter Box and Fuse
Open the OBD adapter box and inspect the fuse. If the fuse looks dark, burned, or broken, replace it with the same type and rating. Do not use a higher-rated fuse as a shortcut, because that can reduce circuit protection.
Next, inspect the vehicle’s OBD II port with a flashlight. Make sure the terminals are not bent, recessed, corroded, or contaminated with dust. A poor physical connection can cause the tuner to act dead even when the tuner itself is working.
Step 3: Perform a Forced Power Test
Start the engine or connect a battery maintainer to raise system voltage above 13V. Then test the tuner again. If the tuner does not power up in constant OBD power mode, switch the adapter box to the external switched-power mode and connect the ACC trigger wire as explained in the next section.
Step 4: Sync Power Through the ACC Trigger Wire
If vehicle voltage is unstable or the tuner behaves differently depending on key position, use the 12V switched power wire. This lets the tuner receive a clean ignition signal and helps it turn on and off with the truck.
Pro Tip: Sometimes a “dead” tuner is not actually dead. On some 2018+ trucks, a loose or failed Security Gateway Bypass harness can interrupt communication at the OBD port. If your truck uses a bypass harness, make sure the connectors are fully seated before replacing the tuner or adapter box.
3. Mini Maxx V2 Power Sync: Using the 12V Switched Power Wire (ACC) for Auto On/Off
After installing a diesel tuner, some users notice that the screen stays on even after the key is removed. This is not only annoying, but it can also shorten tuner life and drain the battery if the truck sits for several days.
The correct solution is to use the 12V switched power wire, also called the ACC trigger wire. This wire tells the tuner when the ignition is on, allowing the device to power up and shut down more like a factory dashboard display.
The Problem
- The tuner screen stays on after the ignition is turned off.
- The user must manually flip the adapter switch every time.
- The vehicle battery slowly drains during long parking periods.
- The tuner does not behave like factory electronics that turn off with the key.
Hardware Logic
The Mini Maxx V2 OBD adapter box has a power input switch. In OBD power mode, the tuner draws power directly from the OBD II port. On many diesel trucks, the OBD II port has constant power, meaning it remains live even when the key is removed. This is why the tuner may stay on 24 hours a day.
In ACC trigger mode, the tuner uses a 12V switched power signal. “Switched power” means the circuit only receives power when the key is in the ON position or when the ignition circuit is active. This setup is usually the preferred method for daily-driven trucks.
How to Connect the 12V Switched Power Wire
- Identify the ACC trigger wire. Locate the red-ended power wire included with the kit. This wire is designed to connect to a vehicle circuit that turns on and off with the key.
- Find a switched fuse source. Use the interior fuse box to locate a circuit that only has power when the key is in the ON position. Common labels include ACC, CIGAR, or IGN. A test light or multimeter can help confirm whether the circuit is truly switched.
- Use an add-a-circuit fuse tap. An add-a-circuit fuse tap is a small adapter that lets you safely pull power from a fuse slot without cutting factory wiring. Crimp the red wire to the fuse tap, then insert it into the correct switched fuse location.
- Connect the DC plug to the adapter box. Plug the round DC connector into the side of the OBD adapter box and move the switch to the switched-power position.
- Test key-on and key-off behavior. Turn the key to ON and confirm the tuner wakes up. Turn the key OFF and confirm the tuner shuts down after the expected delay.
Pro Tip: Once the ACC trigger wire is connected correctly, you no longer need to worry about the tuner staying on and draining the battery. For most Mini Maxx V2 users, this is the cleanest and most reliable power setup.
4. Stuck on “Initializing Communication”? How to Rescue Your Tuner Connection
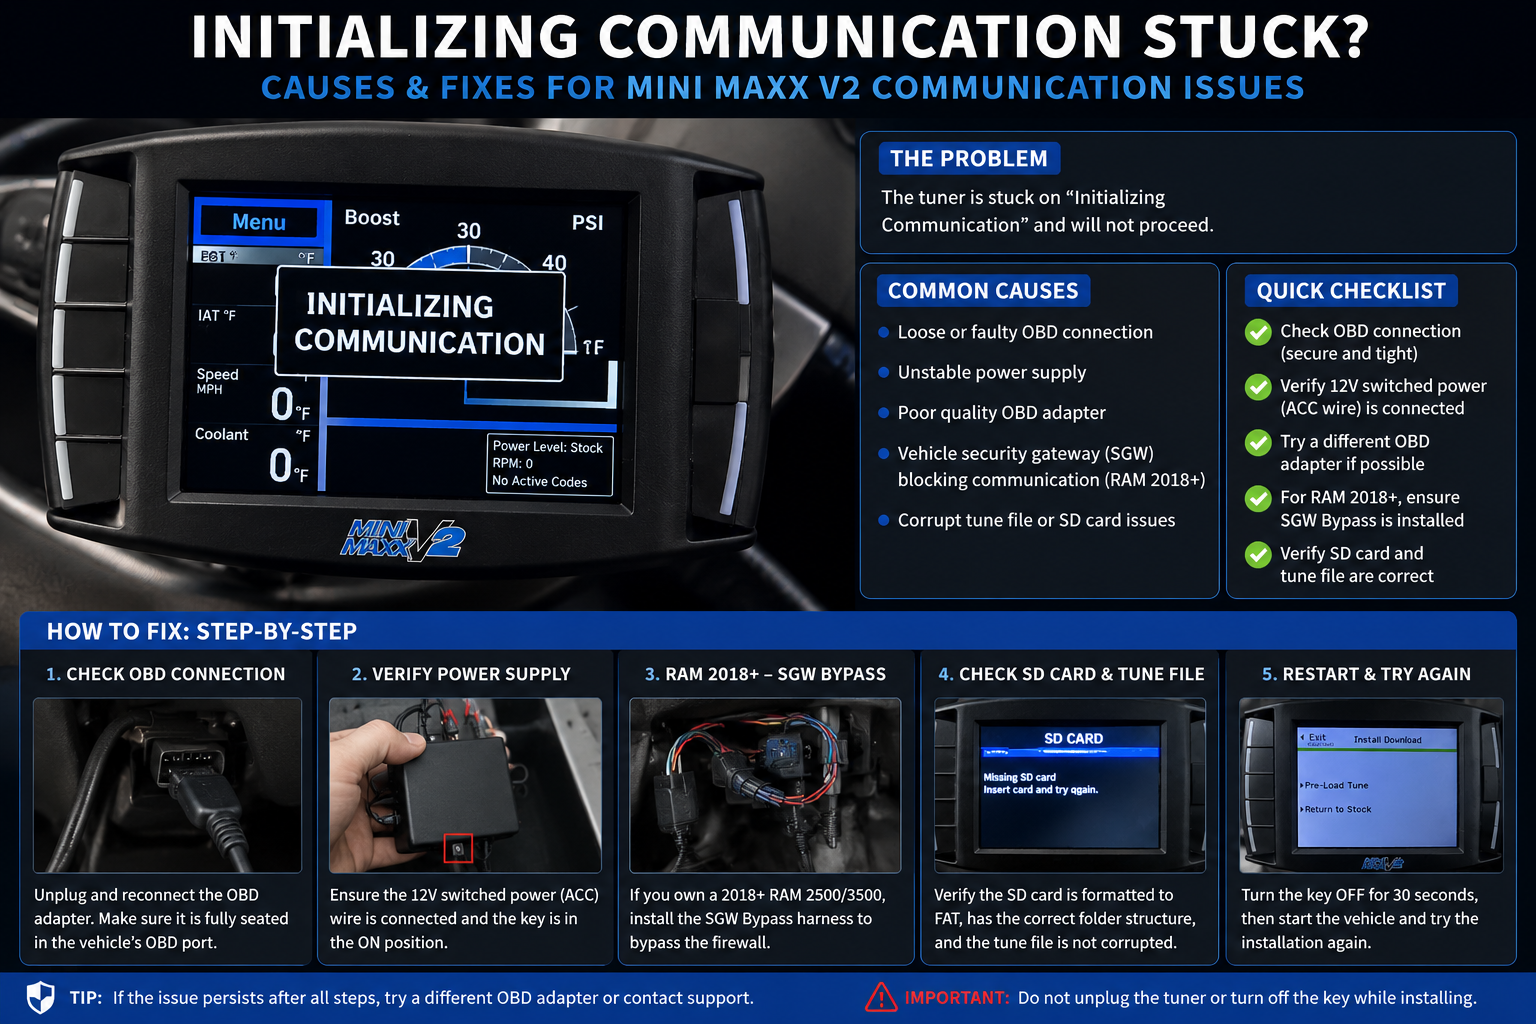
One of the most frustrating issues during car tuner installation is being stuck on the “Initializing Communication” screen. This usually means the Mini Maxx V2 is trying to communicate with the ECU, or engine control unit, through the OBD II port but cannot complete the handshake.
In simple terms, the tuner is powered on, but the vehicle and tuner are not successfully “talking” to each other.
The Problem
- The tuner stays on the initialization screen and does not enter the main menu.
- The screen displays “Vehicle Not Detected” or a communication timeout.
- The tuner powers up normally but cannot read live vehicle data.
- The installation process cannot continue because the truck profile is not recognized.
Diagnosis
- Wrong key position: The key must be in the ON position, with the dashboard lights on, but the engine should not be running. ACC mode is not enough for many trucks because some control modules are not fully awake in ACC.
- OBD port obstruction: Inspect the OBD II connector for rust, dust, bent pins, recessed pins, or poor terminal contact. Even one weak pin can interrupt communication.
- Missing or incorrect vehicle profile: If the SD card does not contain the correct truck configuration file, such as the proper profile for a 6.7L Cummins or 6.7L Powerstroke, the tuner may stay stuck in a communication loop.
- Vehicle security gateway interference: On newer trucks, a security gateway can prevent aftermarket devices from accessing certain vehicle modules unless the correct bypass hardware is installed.
The Pro “Half-Plug” Trick
If normal checks do not solve the issue, some technicians use a practical method often called the “half-plug” trick. This is not a factory-style procedure, but it can help the tuner reach the menu when it is stuck trying to initialize.
- Partially insert the OBD connector. Do not push the connector fully into the OBD port at first. Slowly insert it until the tuner receives power and the screen turns on.
- Press the Menu button immediately. When the tuner lights up and reaches the initializing screen, repeatedly press the upper-left Menu button.
- Enter the truck selection menu. If the tuner allows you into the menu, locate the Change Vehicle option.
- Select the exact vehicle profile. Choose the correct model year, engine, and platform. For example, do not use a 2011–2014 profile for a 2015–2016 truck.
- Fully seat the OBD connector. After saving the correct truck selection, push the OBD connector completely into the port and confirm the connection is solid.
Pro Tip: For 2019–2021 Cummins trucks and certain 5th Gen Ram applications, confirm whether a Security Gateway Bypass is required. Without the correct bypass hardware, many diesel tune devices cannot access the vehicle modules needed for tuning or data communication.
5. What to Do if You Accidentally Turn Off the Key During Installation?
During a diesel tune installation, one rule matters more than almost anything else: do not turn off the key or disconnect power while the tuner is reading or writing data. However, accidents happen. A user may turn the key off out of habit, or weak battery voltage may cause the system to shut down unexpectedly.
If the progress bar suddenly freezes and the tuner appears to stop responding, do not panic. The recovery process depends on staying calm and avoiding unnecessary key cycles.
The Nightmare Scenario
- The key is turned OFF during Full Flash or Install Download.
- The progress bar gets stuck at 35%, 60%, 99%, or another percentage.
- The vehicle dashboard displays multiple warnings, such as Service Required, Anti-Theft, or other system alerts.
- The truck will not start, or the tuner does not immediately return to the normal menu.
Diagnosis
When power is interrupted during a flash, the ECU may be left in a partially programmed state. The ECU, or engine control unit, controls key engine functions. If the flash process is incomplete, the module may not boot normally until the process is recovered.
At this point, do not repeatedly turn the key on and off, and do not try to start the engine over and over. Repeated attempts can make recovery harder and may increase the risk of corrupting the ECU file.
Emergency Recovery Protocol
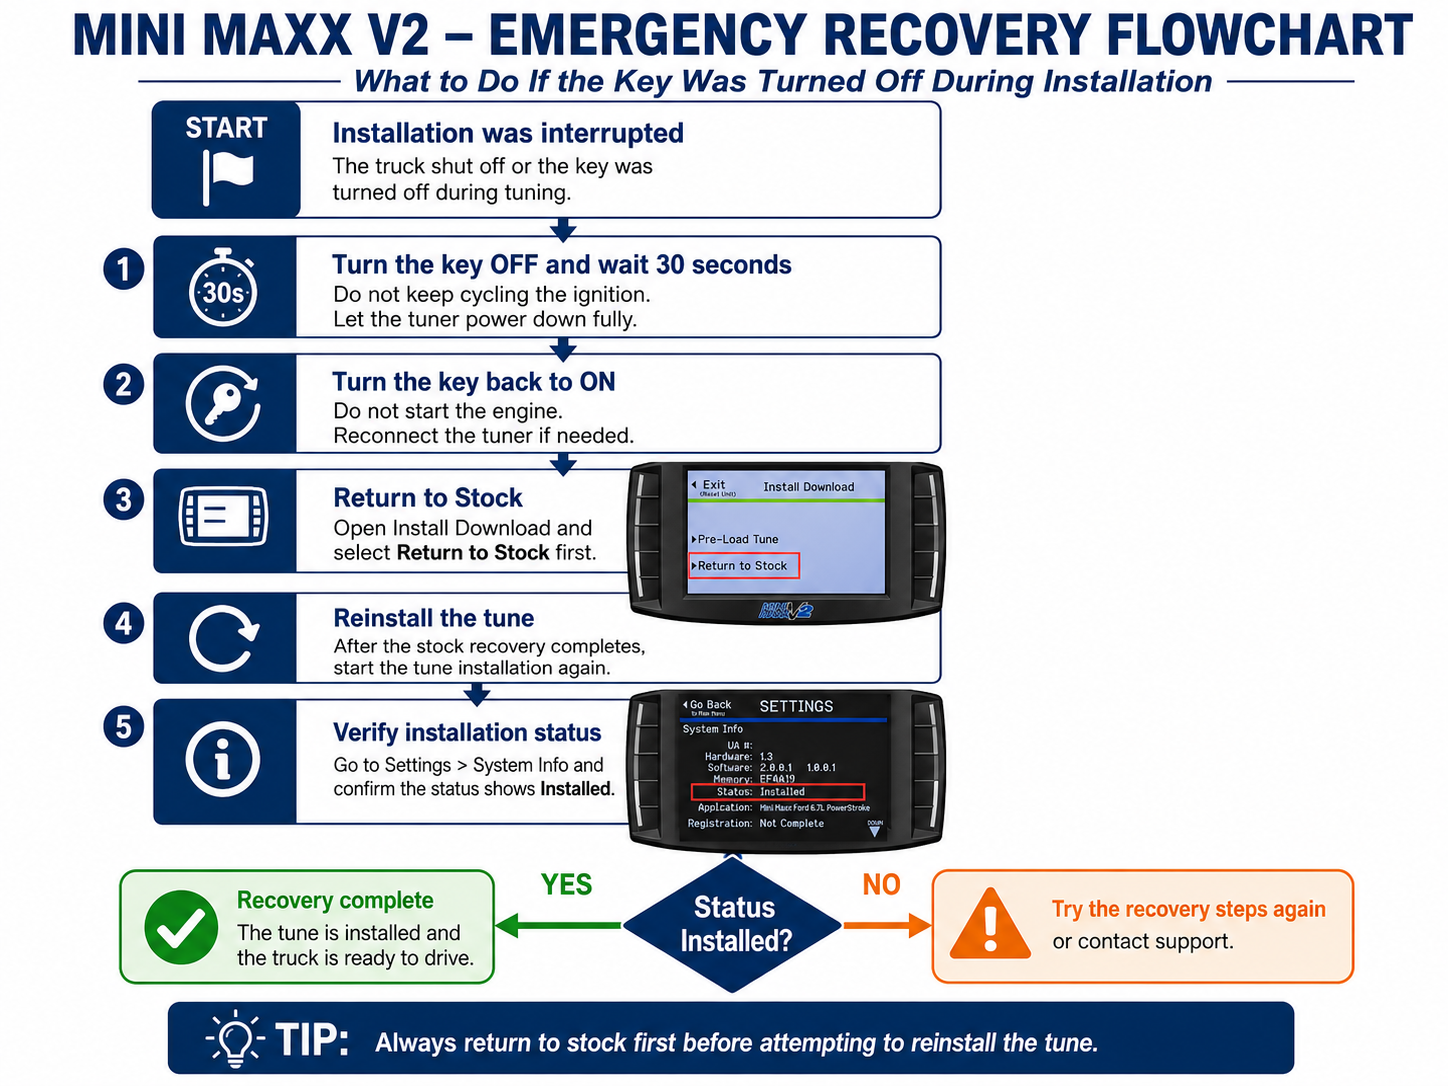
- Perform a physical reset. Stay calm. Unplug the OBD II cable from the adapter box and allow the tuner to fully power down for about 30 seconds. Remove the key completely from the ignition.
- Reconnect and reinitialize. Plug the OBD cable back in securely. Turn the key to the ON position, but do not start the engine. Wait for the Mini Maxx V2 to restart.
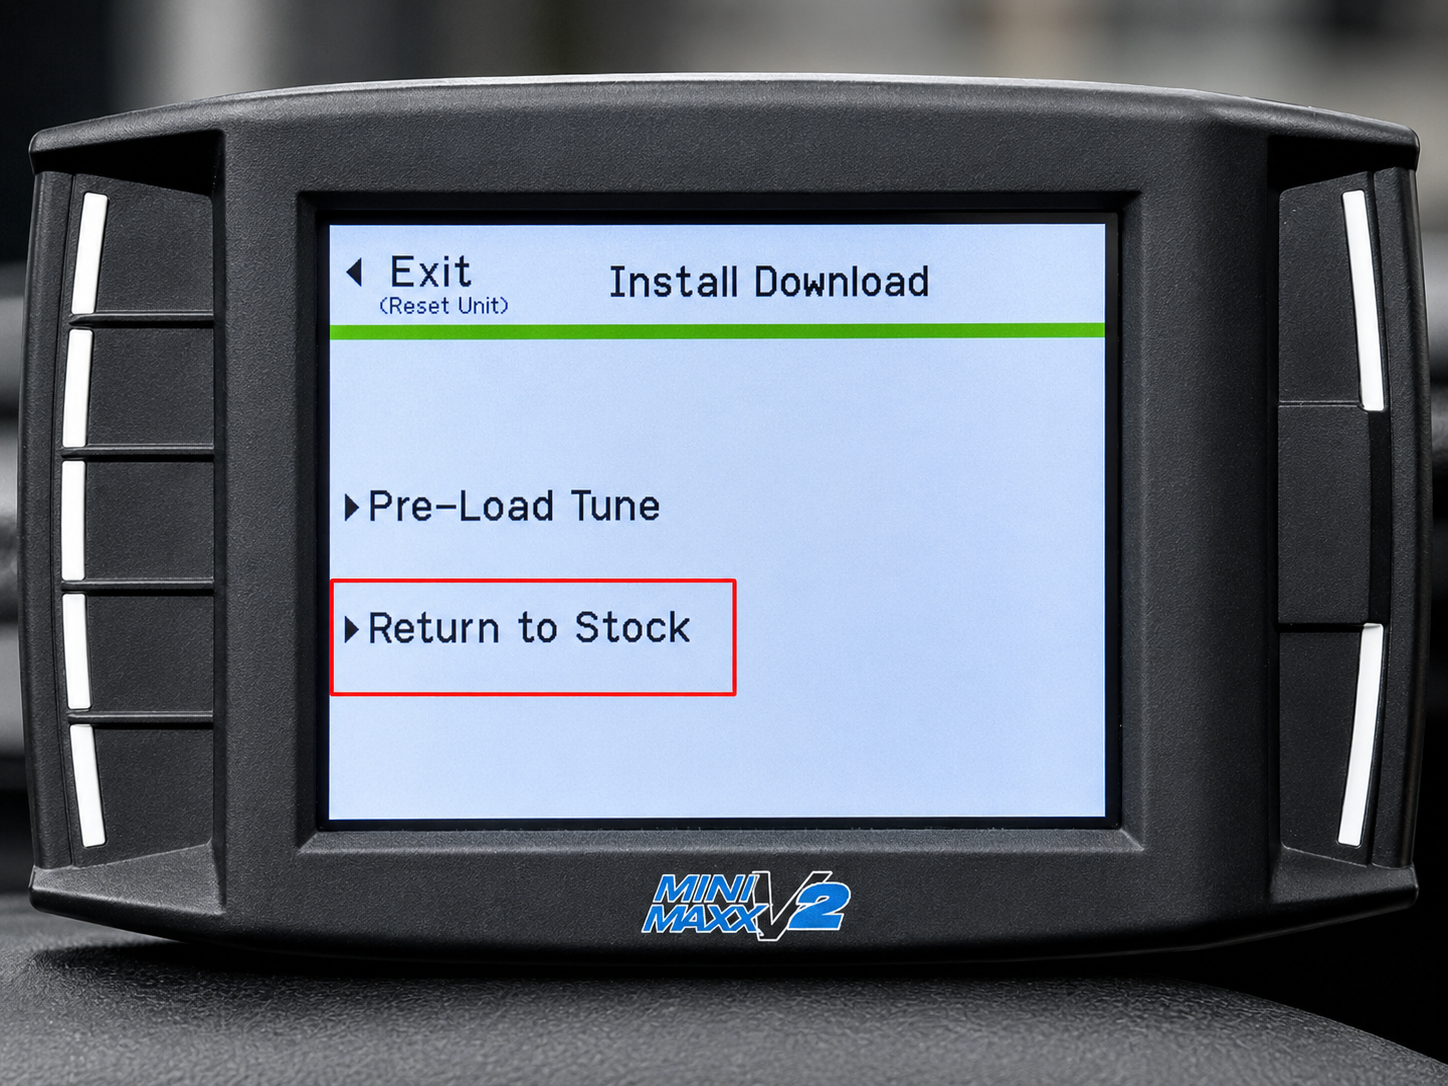
- Return to stock first. If the tuner gives you access to the menu, restore the vehicle back to the stock file first. Because the previous install was interrupted, returning to stock helps clear the unfinished flash state and resets the process.
- Install the tune again. After the stock recovery is complete, restart the normal installation process from the beginning. Make sure the battery voltage is stable before proceeding.
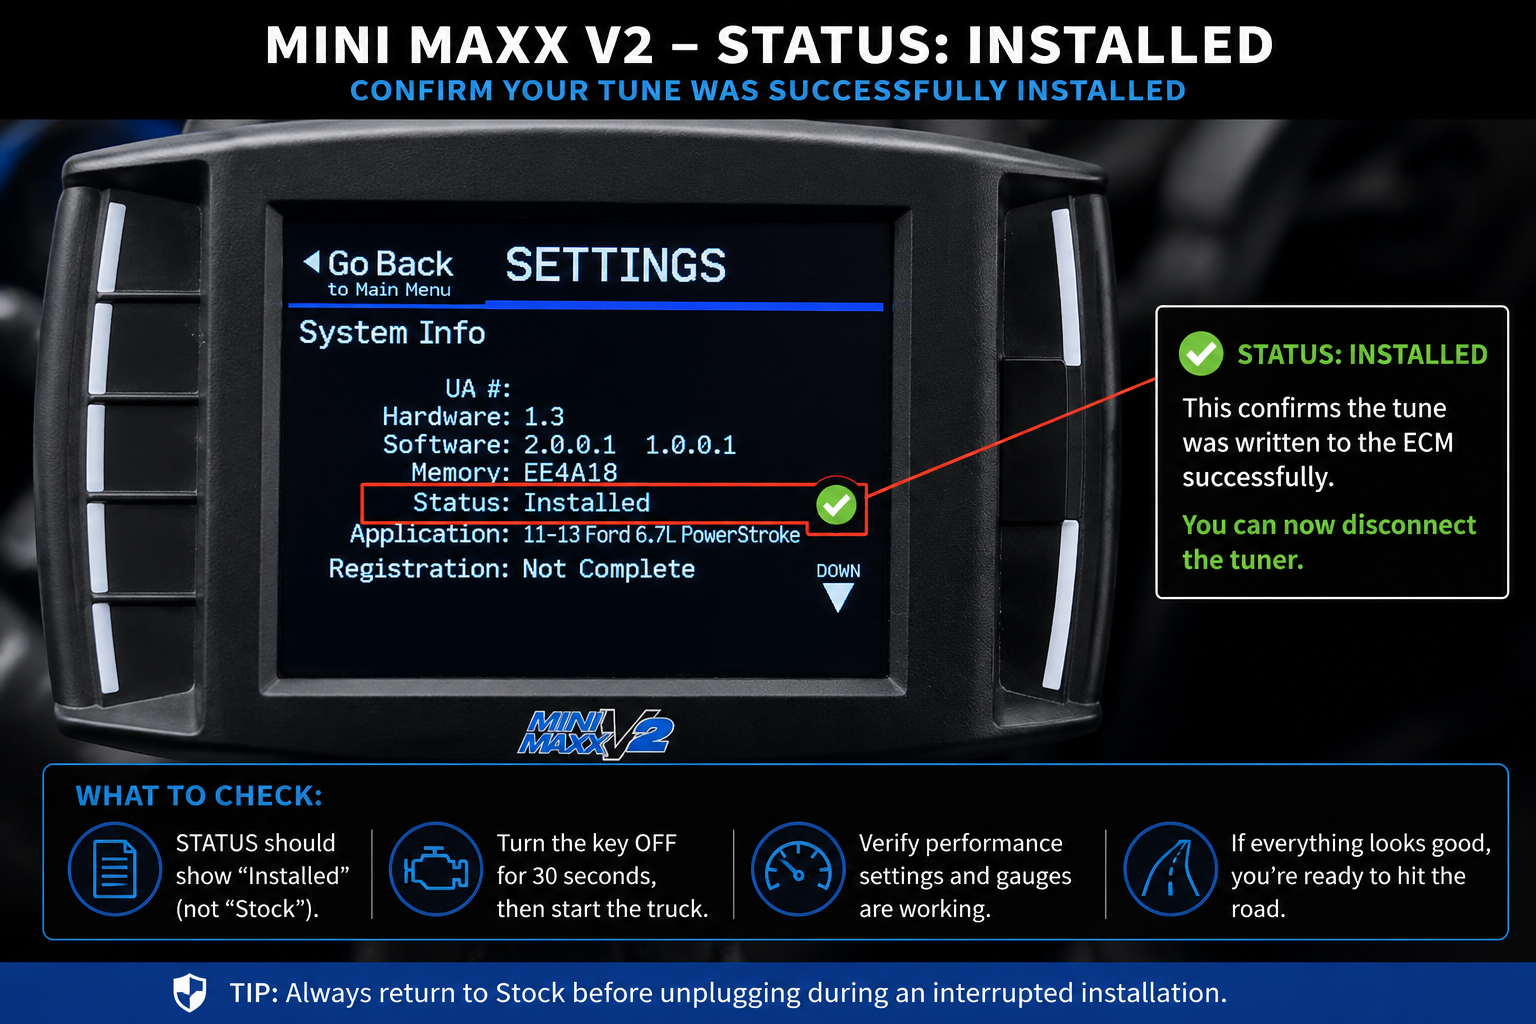
- Confirm installation status. Once the flash is complete, open the Settings/Info menu and confirm that the tuner status shows Installed.
Pro Tip: Use a battery maintainer or charger during every flash. A weak battery can drop below a safe voltage level while the tuner is writing files. Many interrupted installations are caused by voltage loss, not by a defective tuner.

6. When to Stop Troubleshooting: Return & Warranty Standards
If you have already tried the steps above, including SD card reformatting, file structure checks, OBD adapter inspection, ACC trigger wire setup, vehicle profile correction, and communication troubleshooting, but the Mini Maxx V2 still fails, the issue may be hardware-related.
When to Request Return or Warranty Support
If you have strictly followed the Installation Manual (How to Install V2) and issues still persist, it is recommended to cease further troubleshooting and contact our customer service to apply for an RMA (Return Merchandise Authorization) support:
- Repeated fuse failure: The adapter box fuse continues to blow even after you replace it with the correct fuse type and confirm the wiring is correct.
- Persistent screen failure: The tuner still shows a black screen, white screen, glitch screen, or display distortion after you have ruled out battery voltage, OBD connection, USB power, and SD card issues.
- Logic lockup: Even after a factory reset, the tuner cannot read any vehicle VIN or enter a normal truck selection workflow.
- Unstable operation across multiple vehicles: If the tuner shows the same failure on more than one compatible truck, the problem is more likely inside the tuner or adapter system.
What to Prepare Before Contacting Support
Preparing the correct information before contacting customer service can speed up the support process and reduce back-and-forth communication.
- Vehicle VIN: Provide the full VIN so support can verify the exact vehicle configuration.
- Clear photos or videos: Capture the error screen, frozen page, black screen behavior, or white screen issue.
- Power setup details: Explain whether the tuner is powered through the OBD port only or whether the ACC trigger wire is connected.
- Vehicle information: Include year, make, model, engine, transmission, and any major modifications.
- Steps already performed: List the troubleshooting steps you have already tried, such as SD card formatting, fuse replacement, battery maintainer use, and truck profile reset.
Support Tip: The more specific your information is, the faster the support team ( support@suncentauto.com ) can determine whether you are dealing with a setup issue, vehicle-side communication issue, or true hardware failure.
7.Summary
Fixing Mini Maxx V2 problems requires a bit of patience and attention to detail. As long as you ensure stable voltage, standard SD card formatting, and correct ACC wiring, this car tuner will be able to unleash its true potential. We hope this guide helps you get back on the road smoothly and enjoy a powerful driving experience!