Contents
For many BMW F80 M3 owners, the S55 twin-turbo engine delivers exceptional performance straight from the factory. However, once you venture into stage tuning with platforms like MHD or Bootmod3 (BM3), the limitations of the OEM hardware become clear—the sound is overly muffled, and high-RPM backpressure restricts further power gains.
Upgrading your downpipe is not just about unleashing that signature, aggressive M3 rasp; it is also about improving turbo spool and throttle response. Whether you are looking for a balanced downpipe with cat for f80 for daily driving or a high-flow catless downpipe for track use, understanding the installation process, required tools, and potential challenges is essential for any DIY enthusiast.
Quick Facts: F80 M3 Downpipe Installation
| Item | Quick Info |
|---|---|
| Compatible Engine | BMW S55 3.0L Twin-Turbo (F80 M3 / F82 M4 / M2C) |
| Estimated Time | Approx. 5 hours for first-time DIY |
| Installation Difficulty | Medium-High (Requires underbody access and safety experience) |
| Essential Tools | 13mm swivel wrench, O₂ sensor socket, 13mm deep socket, penetrating oil |
| Key Gaskets | Turbo-side metal gaskets, Mid-pipe O-Ring sealing rings |
Preparation Before Installation: Tools, Parts Inspection, and Core Tips
Upgrading an exhaust downpipe on an F80 M3 is not a job that can be completed with brute force alone. The S55 engine bay layout is extremely tight, especially the space behind the turbochargers. Based on real-world DIY experiences, preparing the "right tools" beforehand can save you at least two hours of frustration.
Essential Tool Checklist
Before you begin disassembly, ensure your toolbox includes the following items:
- 13mm Swivel Wrench / Universal Joint Socket: This is the "lifeline" of the entire process, used for removing the V-band clamps in the incredibly cramped space on the turbo side.
- Dedicated O₂ Sensor Socket: Do not attempt to use a standard open-end wrench, as it is very easy to strip the sensor threads. Many owners have been forced to halt their downpipe bmw install midway due to lacking this specific tool.
- 13mm Socket and Long Extensions: Needed for the carbon fiber bracing in the engine bay and the exhaust connections underneath.
- Penetrating Oil: Factory bolts are exposed to extreme heat cycles and often rust. Spraying them in advance can prevent bolt breakage.
- Torque Wrench: Used to tighten nuts to specification during final assembly to prevent leaks.
- Jack and Safety Stands: If you don't have access to a lift, ensure the vehicle is securely supported.
Parts and Components Inspection
Before taking the car apart, perform a "physical exam" on your new downpipe exhaust:
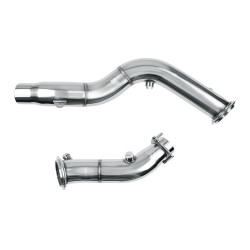
- Fitment Confirmation: Verify that the new unit has 4 oxygen sensor bungs. For instance, the SuncentAuto 3.0" Catless Downpipe is specifically engineered for the S55 engine, with sensor positions that perfectly mirror the OEM layout.
- Seals and Clamps: Check that the V-band clamps are intact. It is highly recommended to have two new turbo-side metal gaskets ready.
- O-Ring Sealing Rings: Verify that the ring gaskets for the mid-pipe connection are present. Lessons from YouTube tutorials remind us: Forgetting this small O-ring will lead to severe exhaust leaks and require a complete teardown and rework.
Pre-Installation Check (Success Tip)
Avoid the Pitfalls: Before installing any downpipe bmw product, run your hand inside the piping to ensure there are no metal shavings left from manufacturing. Additionally, try hand-threading your O₂ sensors into the new bungs to ensure the threads are smooth. If you notice significant deformation at the weld spots, contact support immediately to avoid discovering fitment issues or exhaust downpipe rattles only after the car is fully reassembled.
Once these preparations are complete, you are halfway to a successful DIY project. Next, we will officially enter the engine bay disassembly phase.
DIY Step-by-Step Guide: BMW F80 M3 Downpipe Install
Whether you choose a catted or catless downpipecatless downpipe, the installation logic on the F80 M3 is identical, though certain specific details lean toward the catless configuration. Follow along as we begin the transformation of your BMW F80!
Step 1 — Removing Engine Bay Covers, Carbon Bracing, and O₂ Sensor Connectors
Once your tools are ready, we begin work from the top of the engine bay. The goal of this phase is to clear out operating space and safely disconnect the oxygen sensor electrical leads.
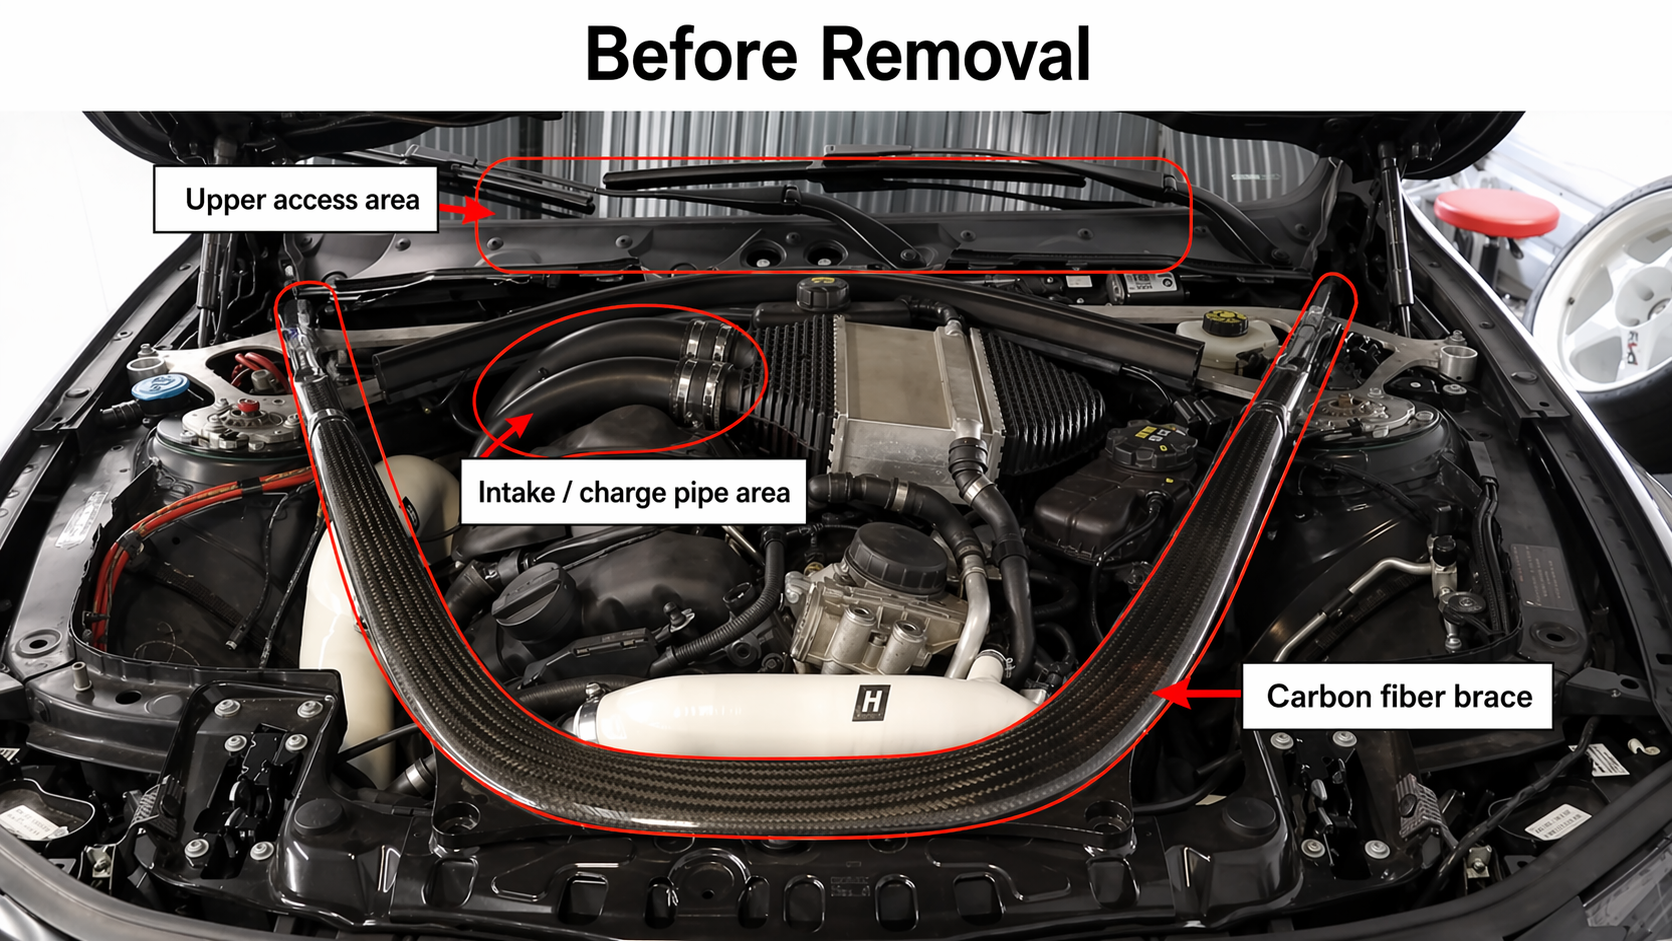
1.1 Removing Carbon Fiber Bracing and Intake Components
The F80 M3 engine bay is spanned by its iconic carbon fiber U-brace. While this enhances chassis rigidity, it sits directly in the path of the downpipe bmw.
- Remove Plastic Trim: First, take off the engine cover and the plastic rain guards on both sides.
- Detach Carbon Brace: Use a 13mm socket to loosen the bolts. Note that carbon fiber components are expensive and brittle; place them in a secure, flat area once removed.
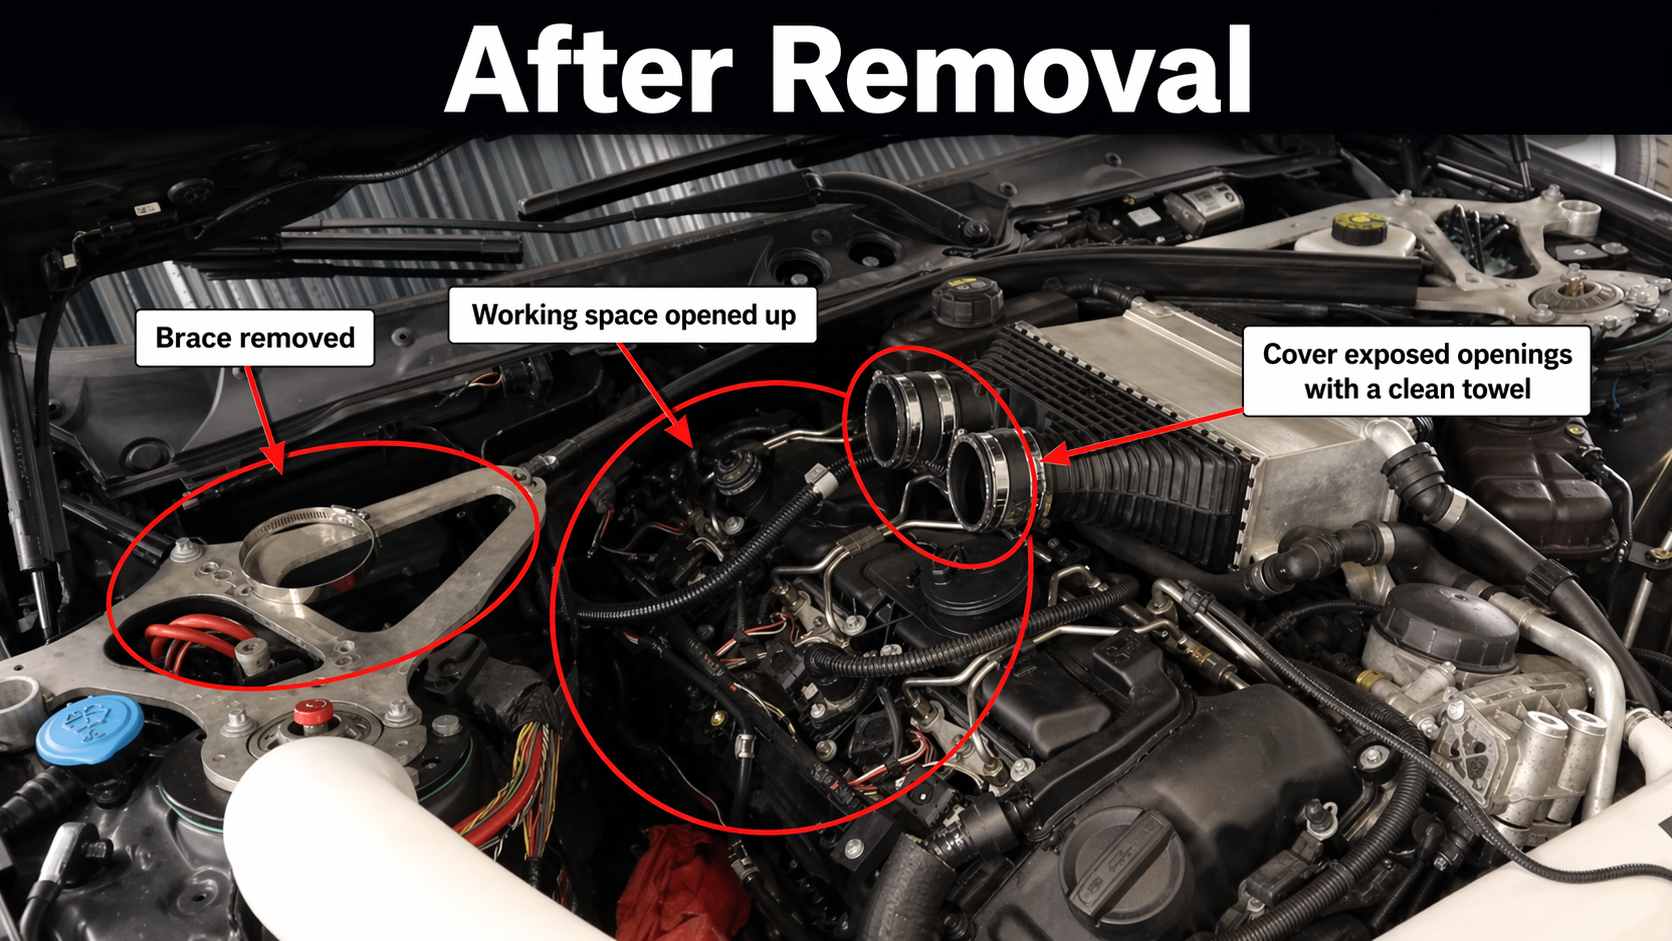
- Protect the Intake Tract: During disassembly, you will often need to move charge pipes or intake ducting. Important Reminder: Securely plug the exposed turbo inlets and charge pipe openings with clean towels to prevent screws or debris from falling into the turbocharger, which would cause catastrophic engine failure.
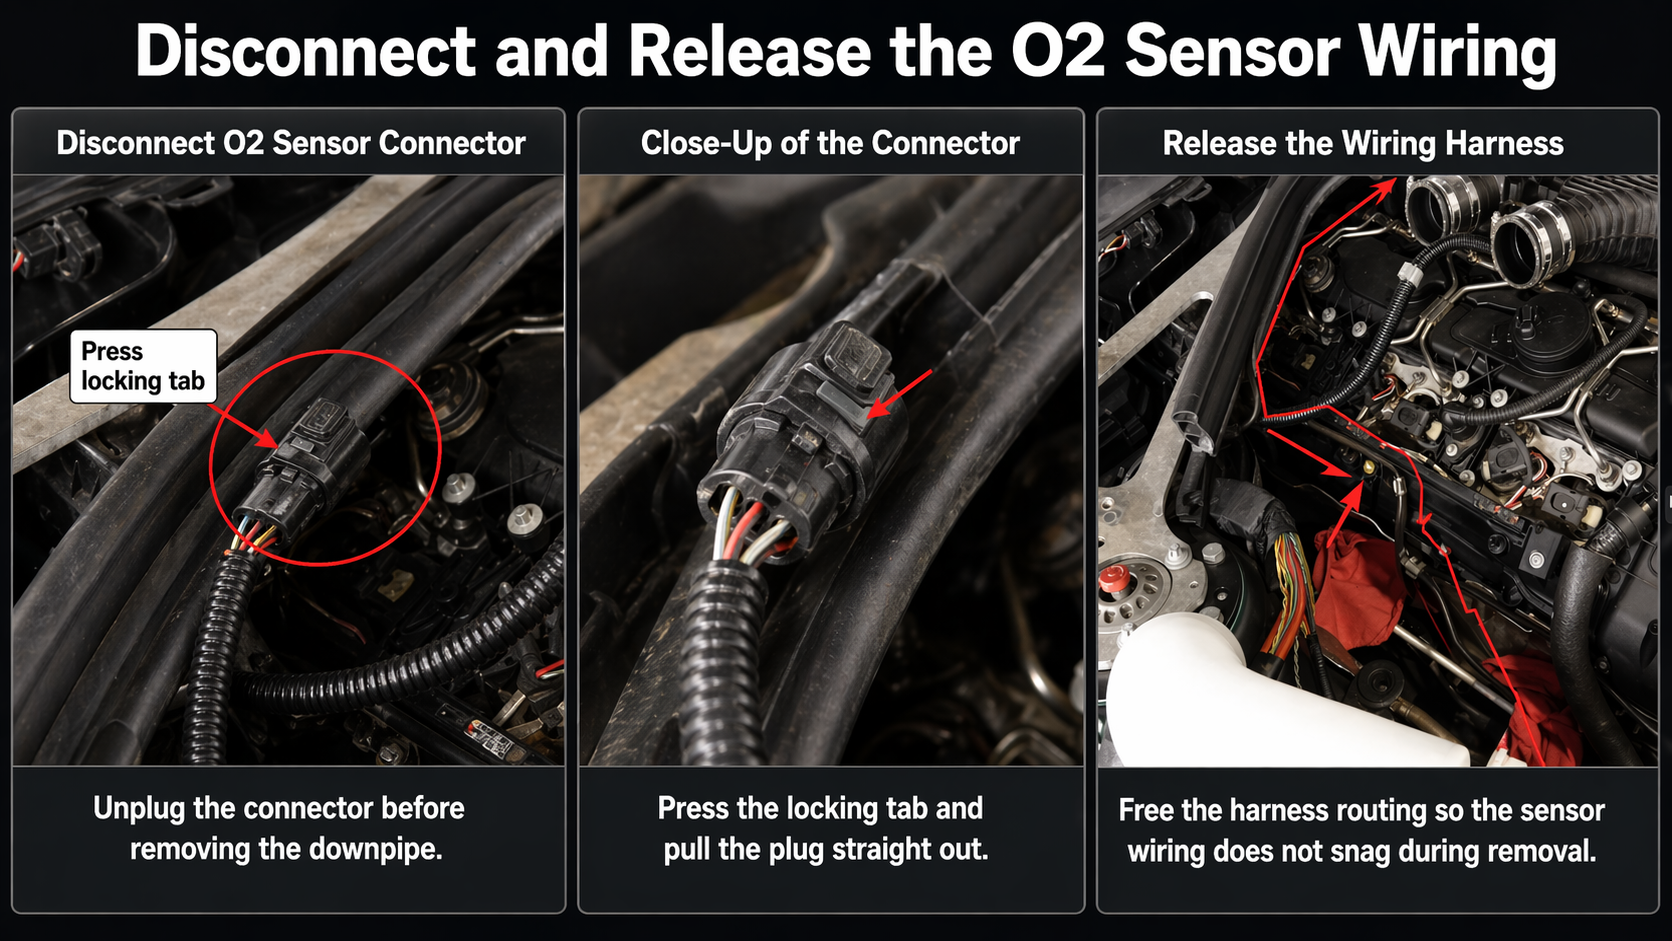
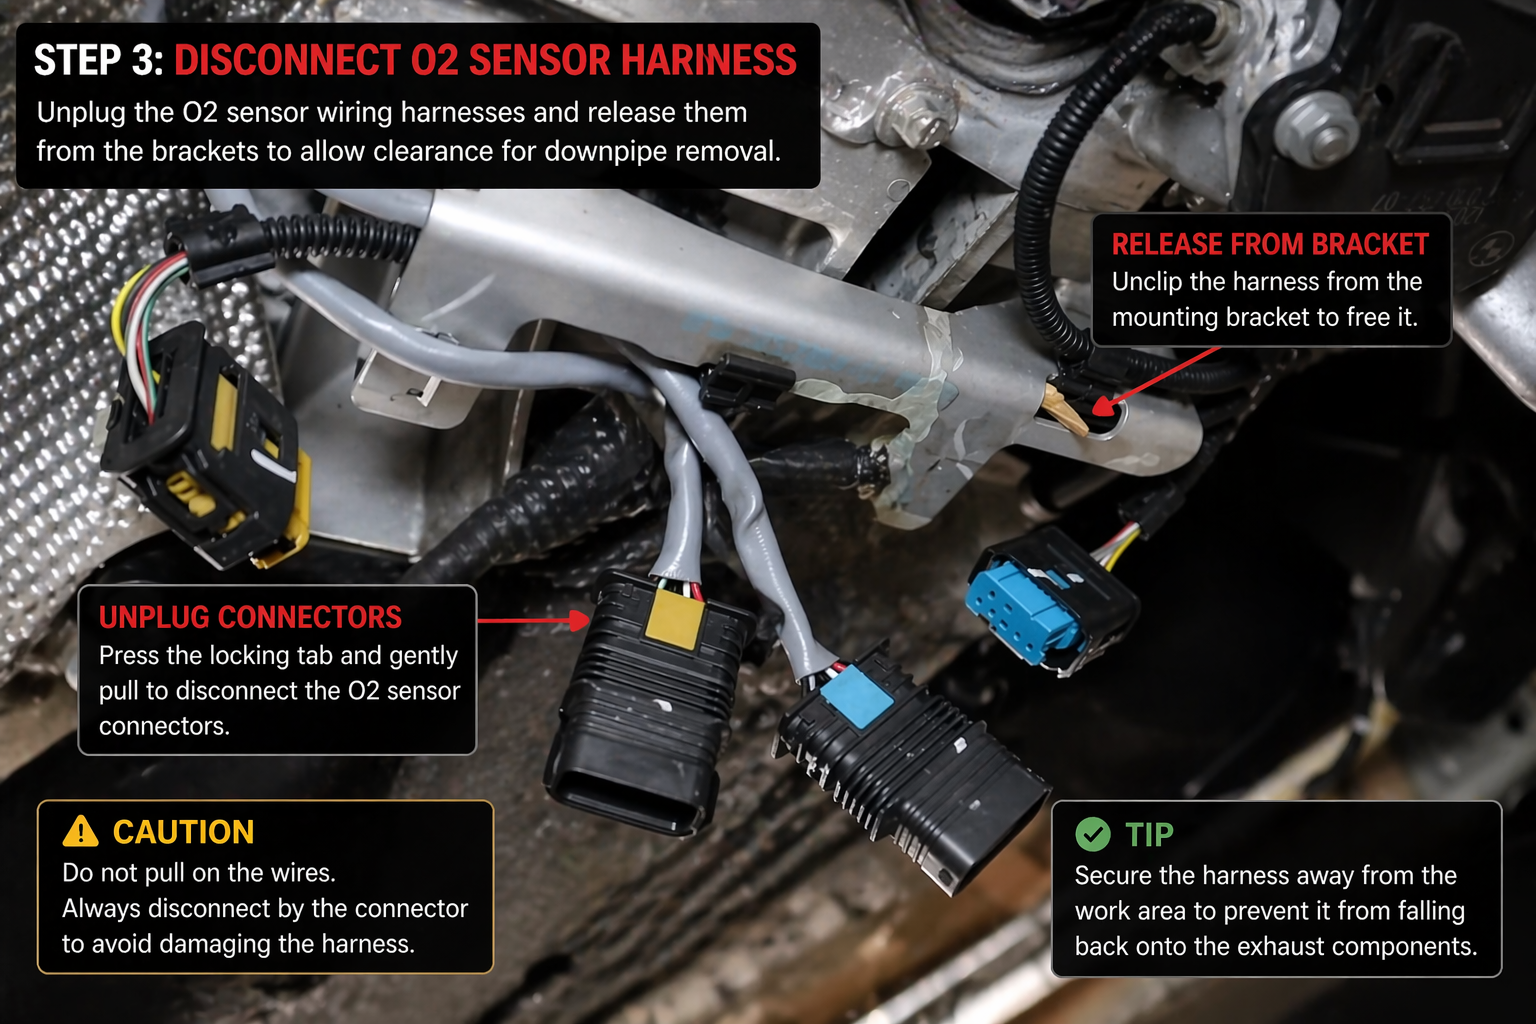
1.2 Labeling and Disconnecting Oxygen Sensors (O₂ Sensors)
Each exhaust downpipe on the S55 engine is equipped with two oxygen sensors (upstream and downstream), totaling four.
- Labeling Logic: Since the sensor wire lengths differ between the "long" and "short" pipes, it is highly recommended to mark the plugs with tape (e.g., "Long-Up," "Short-Down") before unplugging them.
- Wire Management: Carefully unclip the wiring from the plastic retaining clips. Experienced DIYers suggest that fully exposing the O₂ sensor wiring now will save significant time when removing the main pipe body from under the car, preventing damage to the delicate and expensive sensor leads.
1.3 Exposing the Work Area
Once this step is finished, looking down from the top, the V-band clamps connecting the turbos to the downpipe exhaust should be clearly visible. At this point, do not rush to loosen the bolts from above; we need to raise the vehicle and transition to the underbody disassembly.
Step 2 — Underbody Shield Removal and Mid-Pipe Disconnection
After clearing the top section of the engine bay, the focus shifts to the underside of the chassis. This phase is critical for creating an "exit path" for the factory downpipe bmw to be removed.
2.1 Lifting the Vehicle and Removing Underbody Shields
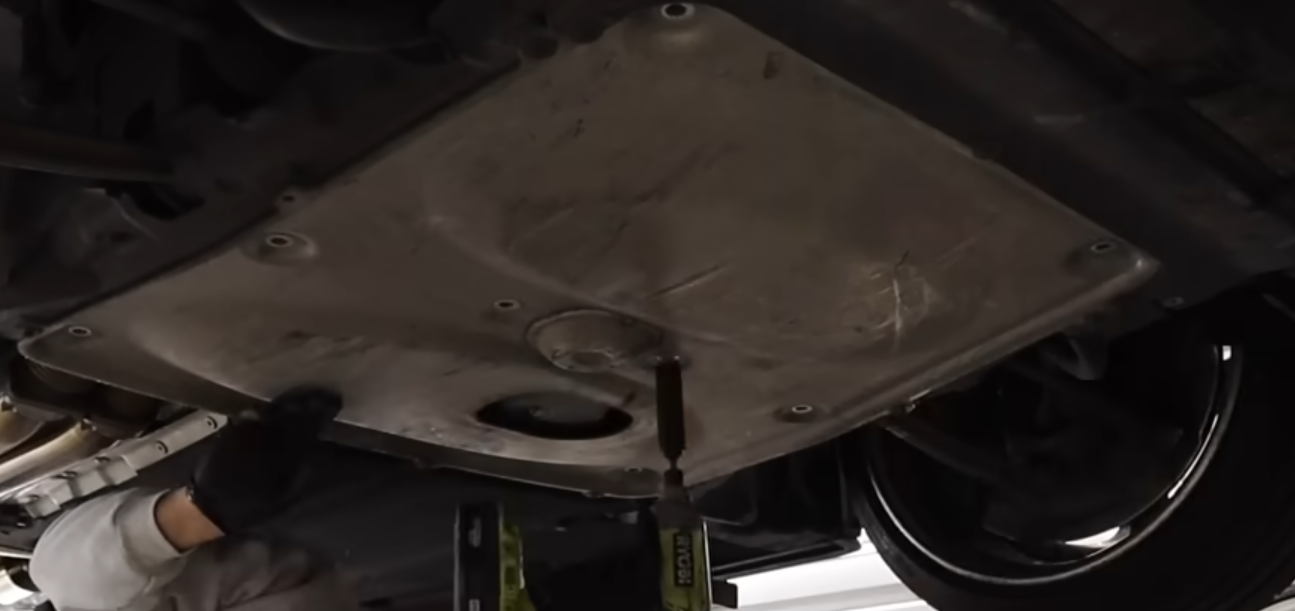
If you are working in a home garage, ensure you use high-quality jacks to lift the vehicle and place it securely on jack stands.
- Remove Plastic and Metal Shields: The F80 M3 underbody is covered by large aerodynamic belly pans. You will need to remove the plastic covers under the transmission and certain metal reinforcement plates to fully expose the connection between the downpipe exhaust and the mid-pipe.
- Clear Operating Space: In some cases, loosening a few bolts near the transmission mount may provide a better rotation angle for your wrench, but be careful not to remove them entirely.
2.2 Disconnecting the Mid-Pipe
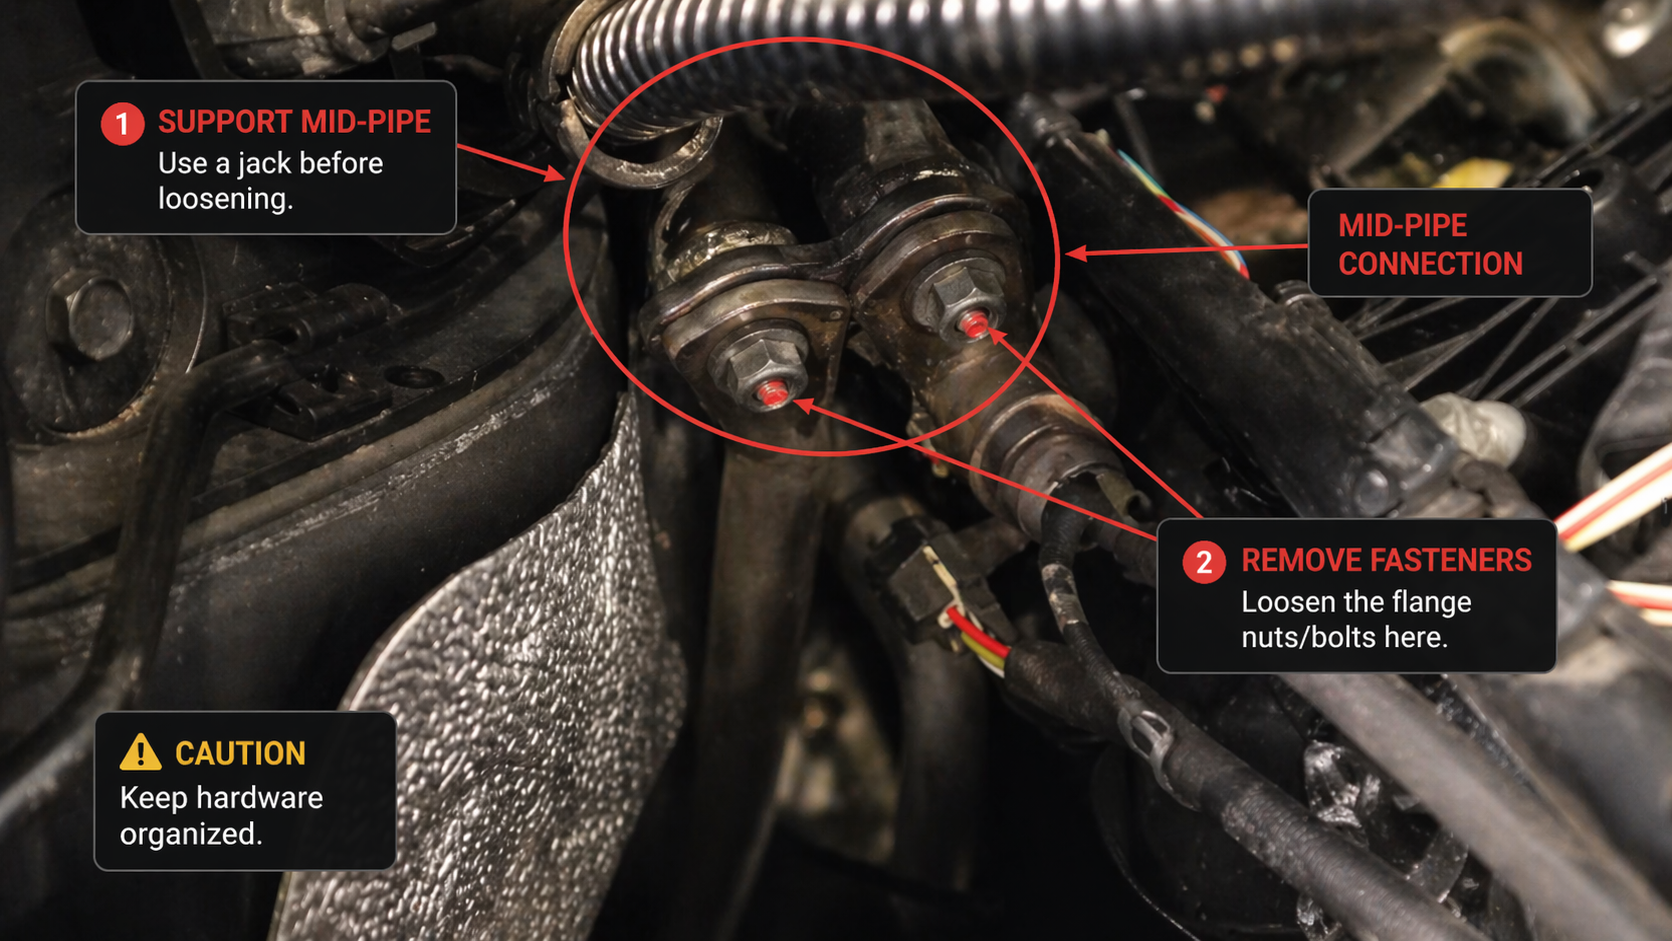
This is the first point of separation between the factory pipes and the rest of the exhaust downpipe system.
- Spray Lubricant: The bolts at the mid-pipe connection are subjected to extreme heat cycles and are often seized. Apply a generous amount of penetrating oil and let it sit for a few minutes before attempting to loosen them.
- Use a Jack for Support: The mid-pipe itself has significant weight. While loosening the flange bolts, it is recommended to use an additional jack to lightly support the mid-pipe. This prevents the pipe from dropping suddenly and makes it much easier to adjust the flange alignment when installing your new downpipe with cat for f80 or catless version later.
2.3 Inspecting the O-Ring Sealing Rings
Once the mid-pipe is separated from the factory units, observe the O-ring gaskets at the connection. Real-world experience shows that if these gaskets are worn out or lost during disassembly, they must be replaced. Otherwise, even the highest quality downpipe will produce an annoying leak upon startup.
With the bottom connection completely disconnected, the factory pipes are now only held by the turbo-side clamps. We are now ready for the most challenging stage: "Turbo-side Removal."
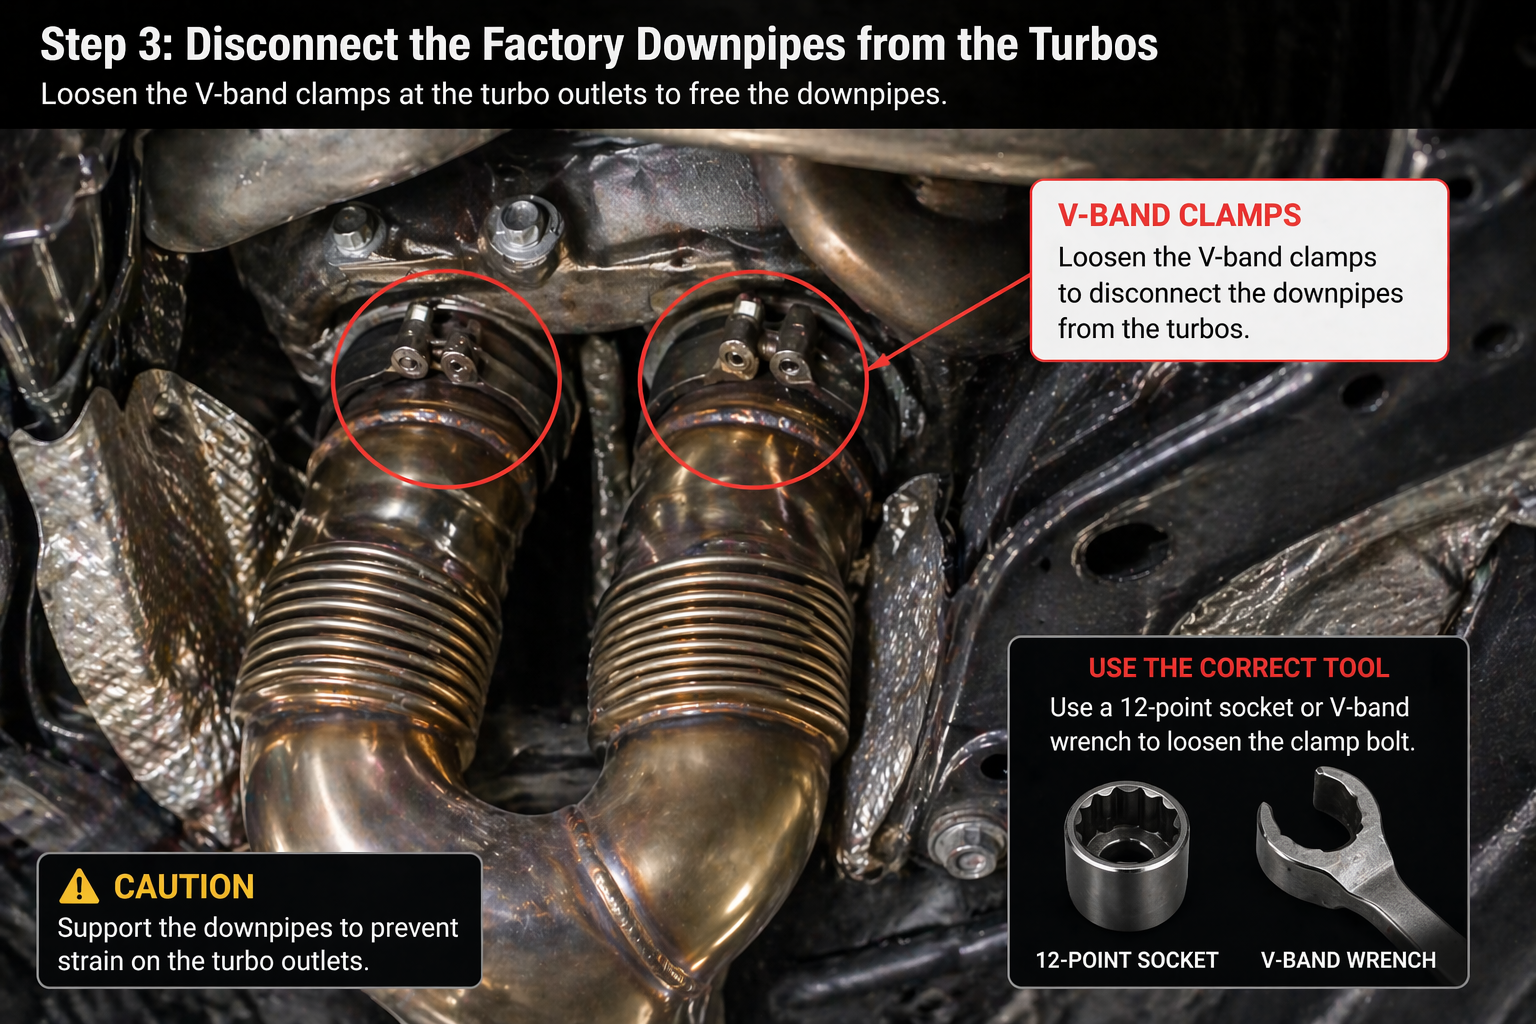
Step 3 — Removing the Factory F80 M3 Downpipes: Conquering the Turbo V-band Clamps
This is widely considered the most challenging part of the DIY process. Due to the compact design of the S55 engine, the connection points at the turbo outlets are tucked into extremely tight spaces at the back of the engine.
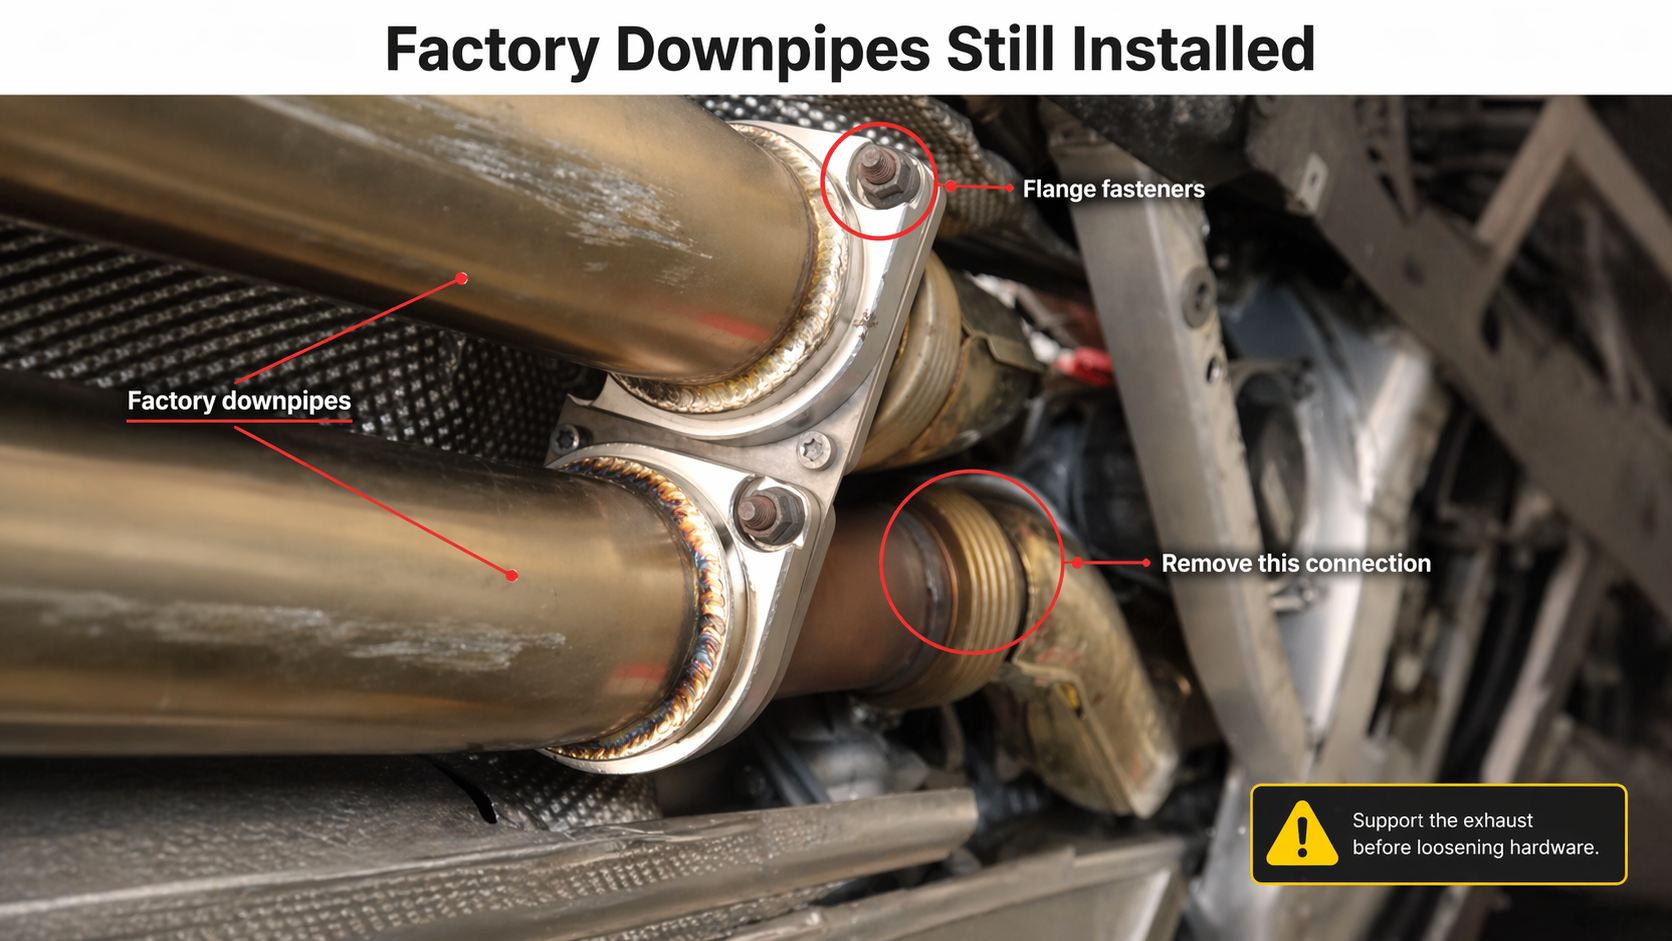
3.1 Tackling the Turbo-Side V-band Clamps
The factory units are held tightly to the turbo outlets by V-band clamps. Removing these requires a bit of "blind operation" skill.
- The "Magic Tool": At this stage, a 13mm swivel wrench or a socket with a universal joint is your only savior.
- Operational Technique: Reach in from the top of the engine bay to locate the clamp nuts by feel. Because heat cycles cause metal expansion and sticking, the clamp may remain tightly seized to the flange even after the nut is loosened. Use a small flat-head screwdriver to gently pry the edges of the clamp until it pops free.
- Practical Insight: As noted in many DIY logs, the passenger-side clamp is often more difficult to handle than the driver-side due to space constraints and seal adhesion; it requires extra patience and subtle angle adjustments.
3.2 Removing the Long and Short Downpipes
The two pipes on the F80 M3 vary in length and curvature.
- Removal Order: It is generally recommended to remove the pipe with more surrounding clearance first to create more room to maneuver the second one.
- Protecting Surrounding Parts: Be gentle when pulling out the factory exhaust downpipe. Avoid scratching the metal flanges against the heat shields, AC lines, or sensor wiring harnesses.
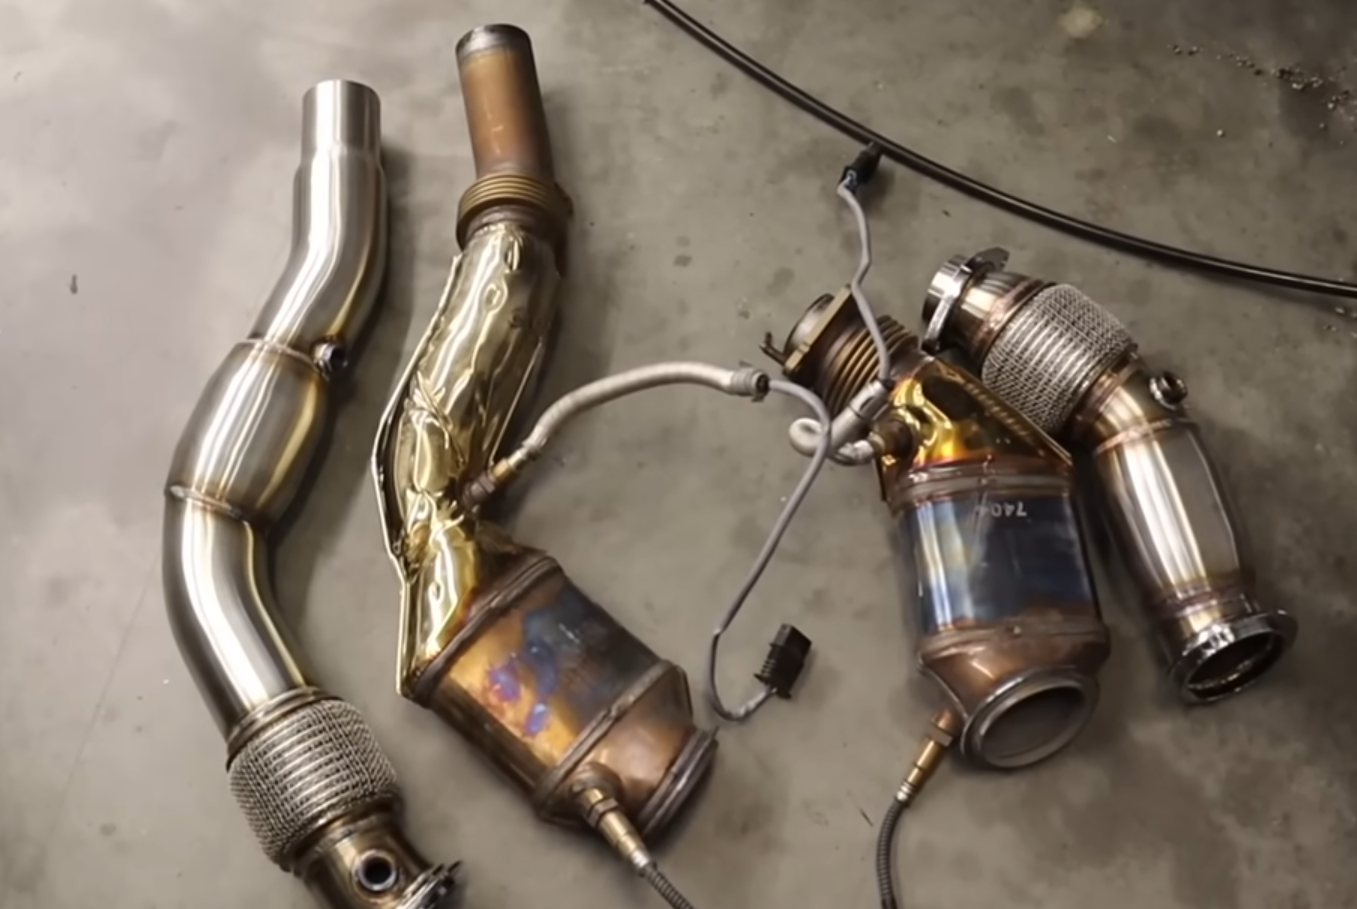
- Comparison Check: Once both the long and short factory pipes are out, lay them next to your new SuncentAuto 3.0" Catless Downpipe. You will notice how bulky and heavy the OEM downpipe bmw is compared to the lightweight, high-flow design of the upgrade.
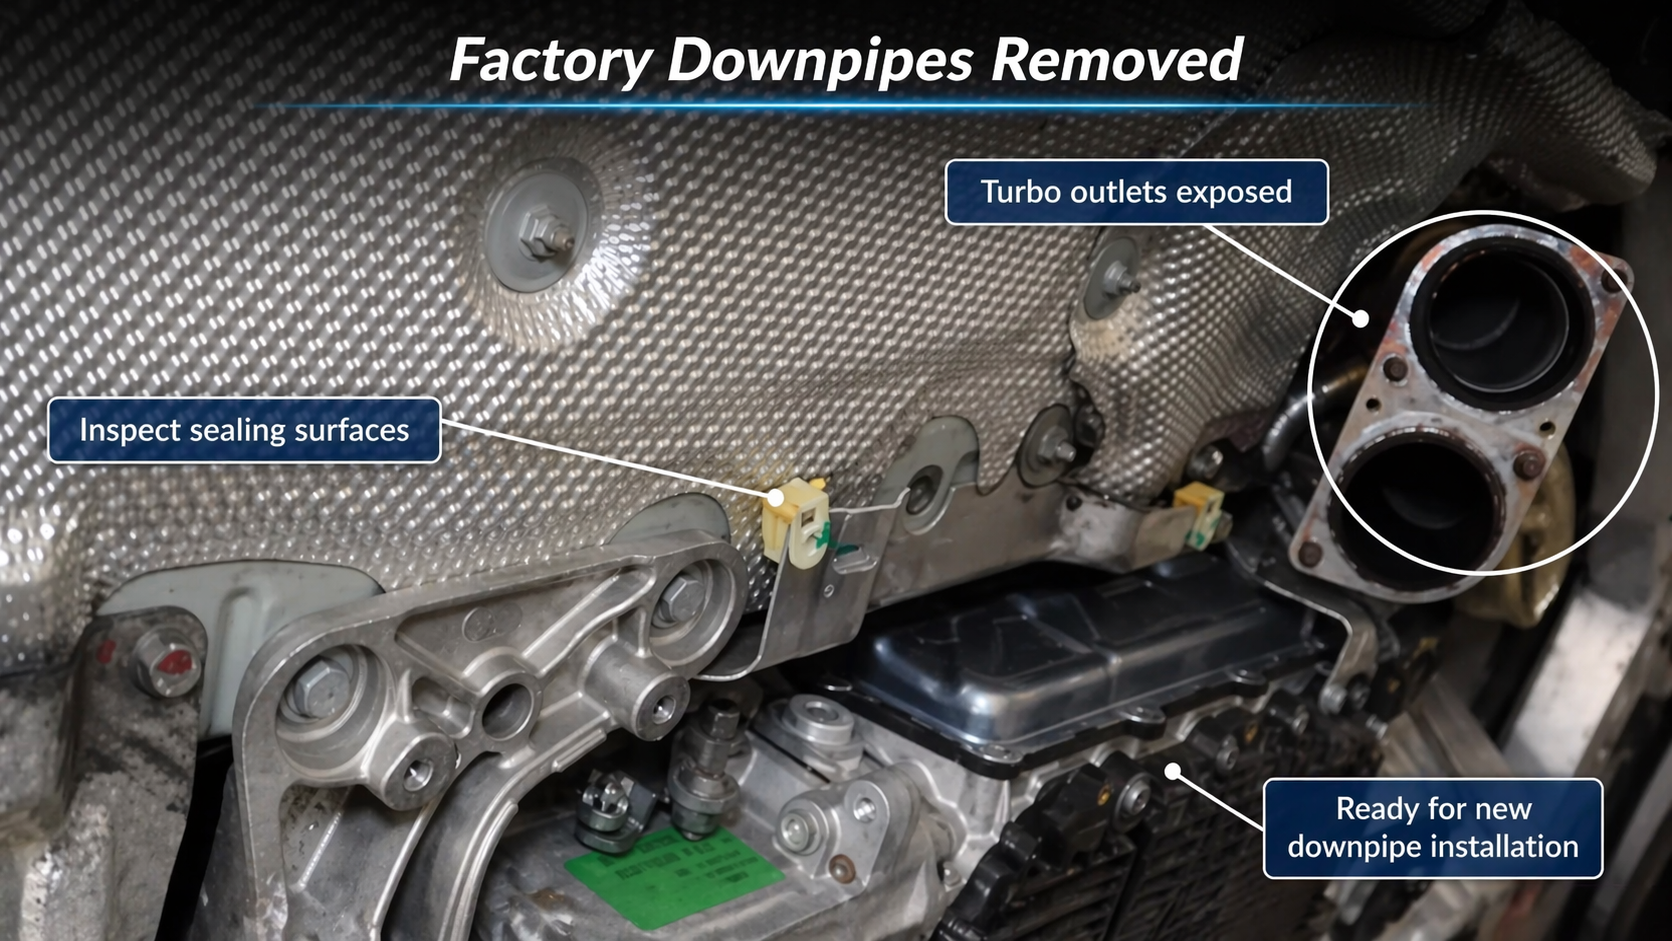
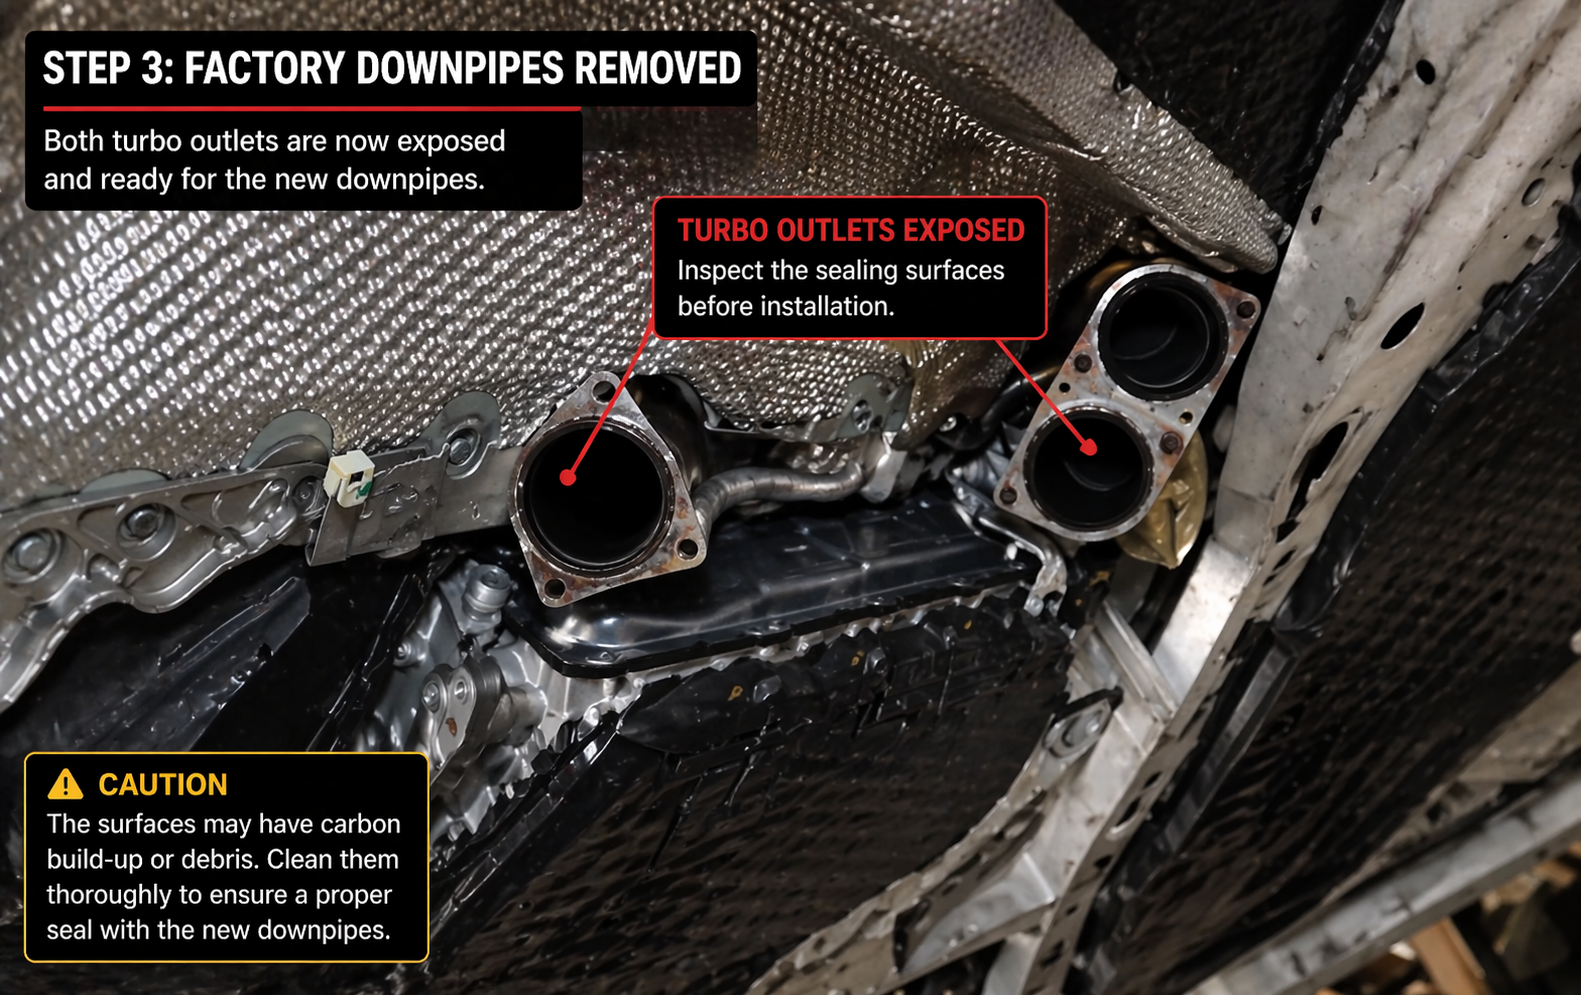
3.3 Handling Oxygen Sensors
With the pipes on the ground, use your dedicated O₂ sensor socket to remove the four sensors while you have plenty of room to work.
Core Tip: You must place these sensors exactly according to the labels you made earlier (Long/Short, Up/Down). While they may look similar, their harness lengths and feedback signals are strictly mapped in the ECU logic. Mixing them up will cause the car to enter "limp mode" immediately upon startup with a series of difficult-to-diagnose fault codes.
Step 4 — Installing the New Pipes: The Balancing Act of Alignment and Sealing
The installation of your new downpipe exhaust is generally faster than the removal, but it requires a higher level of precision. To ensure your downpipe bmw doesn't leak or rattle under high pressure, pay close attention to these practical details.
4.1 Adjusting Angles: The "Puzzle" of the Long Downpipe
The Long Downpipe for the F80 M3 is the most difficult piece to seat correctly due to its sharp bends.
- Clearance Hack: If the new pipe doesn't slide onto the turbo flange smoothly, do not force it. A proven tip is to slightly bend the edge of the heat shield. Just a few millimeters of extra clearance is often all you need for the pipe to drop into place.
- Loose Positioning: Hang the downpipe on the turbo studs and lightly thread the V-band clamp, but do not lock it down yet. Keeping some "wiggle room" is essential for aligning the bottom flanges with the mid-pipe in the next step.
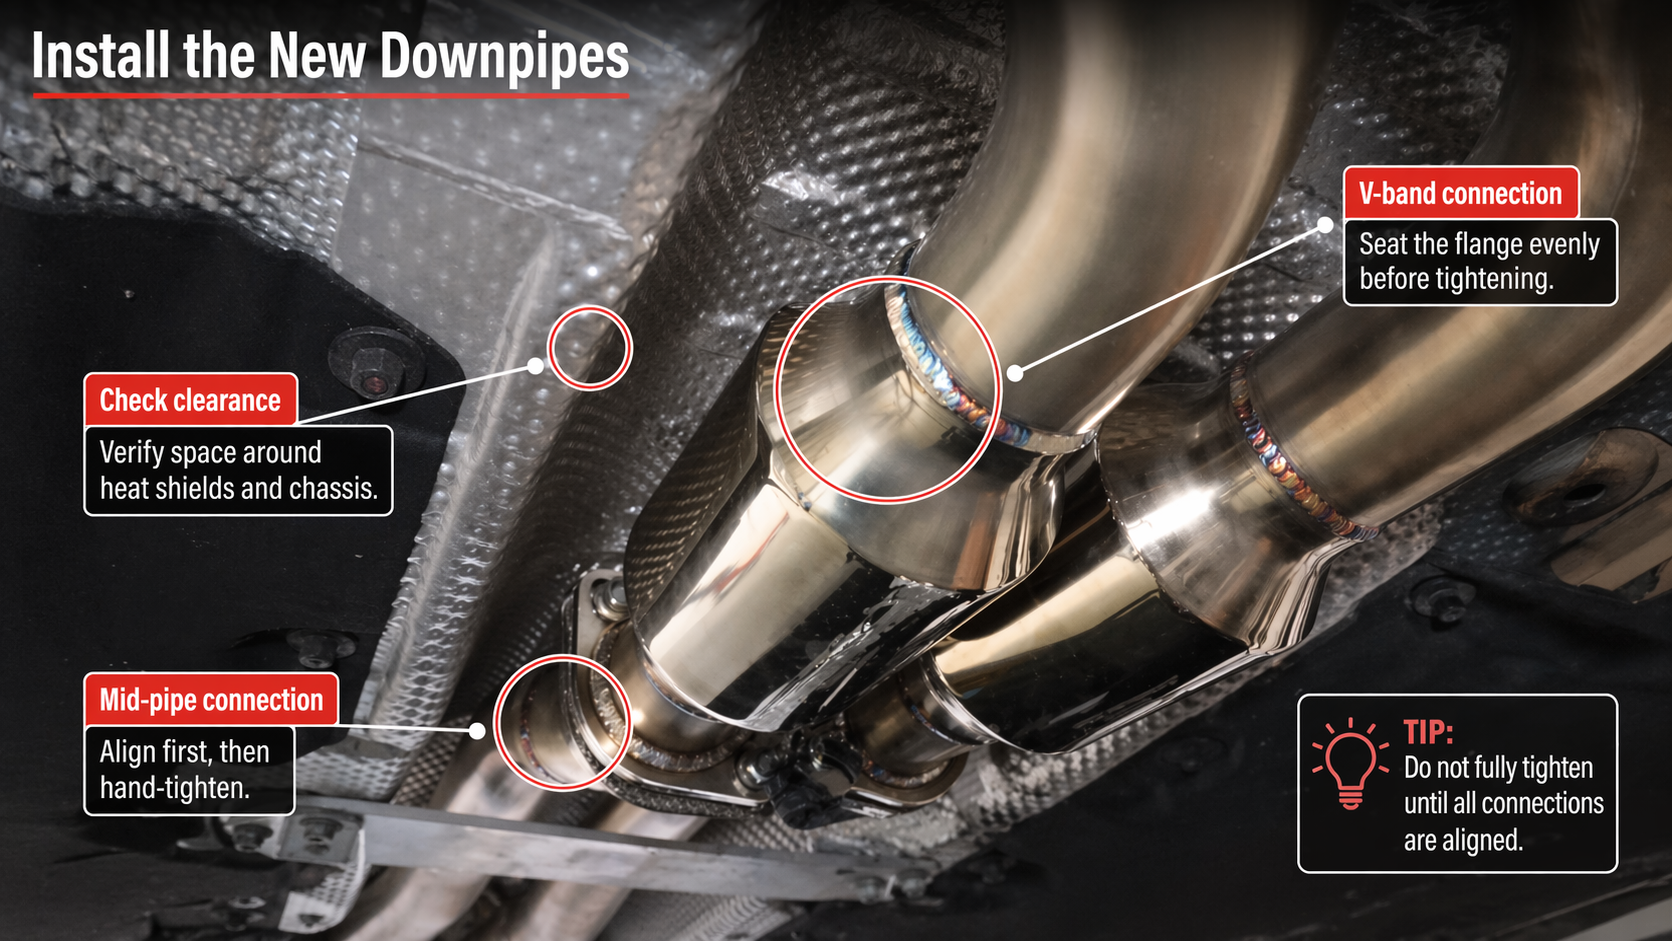
4.2 Sealing Integrity: Tightening the V-bands and Gaskets
The success of your modification depends entirely on the seal.
- Inspect the Ring Gaskets: Double-check that the turbo-side metal gaskets and the mid-pipe O-rings are perfectly seated. If you forget these, you will be forced to disassemble everything and start over.
- Torque Specs: Tighten the V-band nuts using a 13mm socket. While brands vary, the general standard for these clamps is 14 ft-lb (approx. 19 N·m). Tighten in stages to ensure the clamp wraps evenly around the flange edges.
4.3 Reinstalling O₂ Sensors and Routing
Thread the sensors into the bungs of your new downpipe bmw. Products like the SuncentAuto Catless Downpipe feature precision-drilled bungs that place the sensor probe in the ideal exhaust flow path.
- Anti-Seize Treatment: Apply a tiny amount of sensor-safe anti-seize to the threads for easier maintenance in the future.
- Heat Safety: Ensure the wiring is secured back into the plastic clips and kept away from the hot 3.0" stainless steel piping. If the harness touches the pipe, the insulation will melt, leading to a short circuit.

4.4 Connecting the Mid-pipe
Use a jack to support the mid-pipe, aligning its flange perfectly with the base of the new exhaust downpipe. Once the bolts are tight, give the entire system a firm shake to ensure there are no metal-on-metal rattles. At this point, the heavy lifting is done, leaving only the engine bay reassembly.
Step 5 — Engine Bay Reassembly and the Thrilling First Cold Start
With all bolts underneath the chassis tightened to the correct torque, we can return to the engine bay for the final assembly. While this may seem like a simple reversal of the disassembly, specific details ensure the long-term reliability of your BMW F80 M3.
5.1 Restoring Engine Bay Components
- Reinstall Charge Pipes and Intake System: Reconnect the charge pipes and intake ducting removed earlier. Be sure to double-check that every clamp is tight; even a minor boost leak can trigger a "Drivetrain Malfunction" or significant power loss in the S55 engine.
- Reconnect O₂ Sensor Plugs: Following your previous labels, accurately plug the four oxygen sensor connectors into their respective harness bases. Listen for a "click" to ensure a secure connection.
- Reinstall the Carbon Fiber U-Brace: Put the iconic F80 M3 carbon fiber brace back into position. It is recommended to hand-tighten all bolts first to ensure alignment before torquing them down, avoiding stress damage to the expensive carbon structure.
5.2 Final Pre-Start Checklist
Before pressing the Start button, spend 3 minutes on a final scan:
- Ensure no sockets, wrenches, or shop towels are left in the engine bay.
- Verify again that no wires are in direct contact with the surface of the new downpipe bmw.
- Check under the car for any dropped gaskets or stray screws.
5.3 The First Cold Start: Awakening the Senses
The moment you push the Start button, you will immediately feel the transformative power of a catless downpipe.
- Sound Explosion: Due to the S55’s cold-start fast idle strategy, the exhaust note will be several times louder than stock. You will hear a deeper, more aggressive tone with a distinct metallic rasp.
- Valve Open Effect: If you use an MHD tune or the OEM sport mode to open the exhaust valves, the sound becomes truly feral. That signature M3 "gritty" texture is fully unleashed, accompanied by the subtle whistle of the turbo spooling down—the exact mechanical aesthetic enthusiasts crave.
- Initial Observation: After running for 1-2 minutes, check the dashboard for warning lights. If you installed a SuncentAuto Catless Downpipe without a corresponding software tune, a Check Engine Light (CEL) is a normal physical reaction and can be resolved with a Stage 2 flash.

Conclusion
The entire installation process takes about 5 hours and comes with the challenge of working in tight spaces. However, when that pure, raw M3 sound echoes through your garage, every bit of effort feels worth it. Completing an exhaust downpipe DIY brings a level of satisfaction that simply handing over your keys to a shop cannot provide.
Whether you choose the high-value SuncentAuto 3.0" catless downpipe or another balanced solution, as long as you have the right tools and patience, your M3 will reward you with an unforgettable roar.