Contents
- Quick Answer: What Do You Need for a 6.7 Cummins Delete?
- Before You Start: Confirm Your Truck, Parts, and Installation Requirements
- 6.7 Cummins Delete Kit Parts Checklist
- Tools You Should Prepare Before Installation
- Recommended Installation Order
- How Long Does a 6.7 Cummins Delete Take?
- Common Mistakes to Avoid
- Notes and Disclaimer
- A Note to Readers
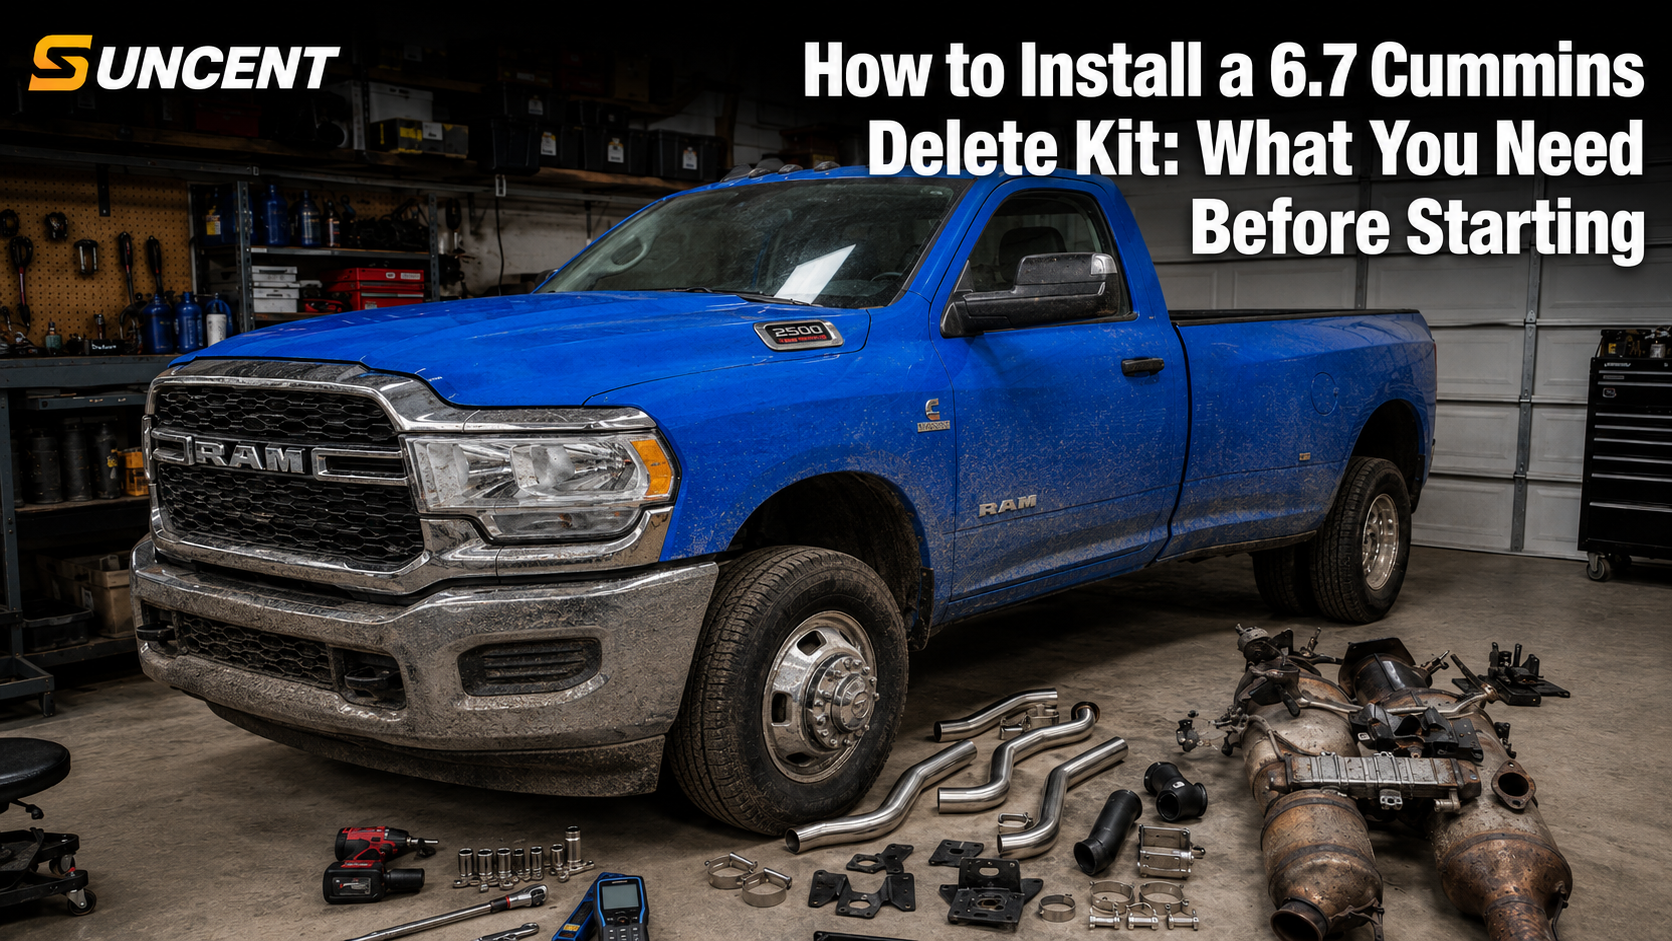
Modifying a diesel truck can feel a lot like starting a weight-loss plan: once you experience smoother power delivery, better fuel economy, and lower long-term maintenance costs after removing unnecessary hardware, it is hard to go back to the restricted factory setup. Instead of repeatedly patching problems caused by frequent DPF clogging or EGR failures, many owners choose a one-time “surgery” to remove those burdens. This type of modification can help address carbon buildup at the source, reduce your truck’s weight by around 150 pounds, and help your 6.7 Cummins engine return to a cleaner, more direct performance state.
Quick Answer: What Do You Need for a 6.7 Cummins Delete?
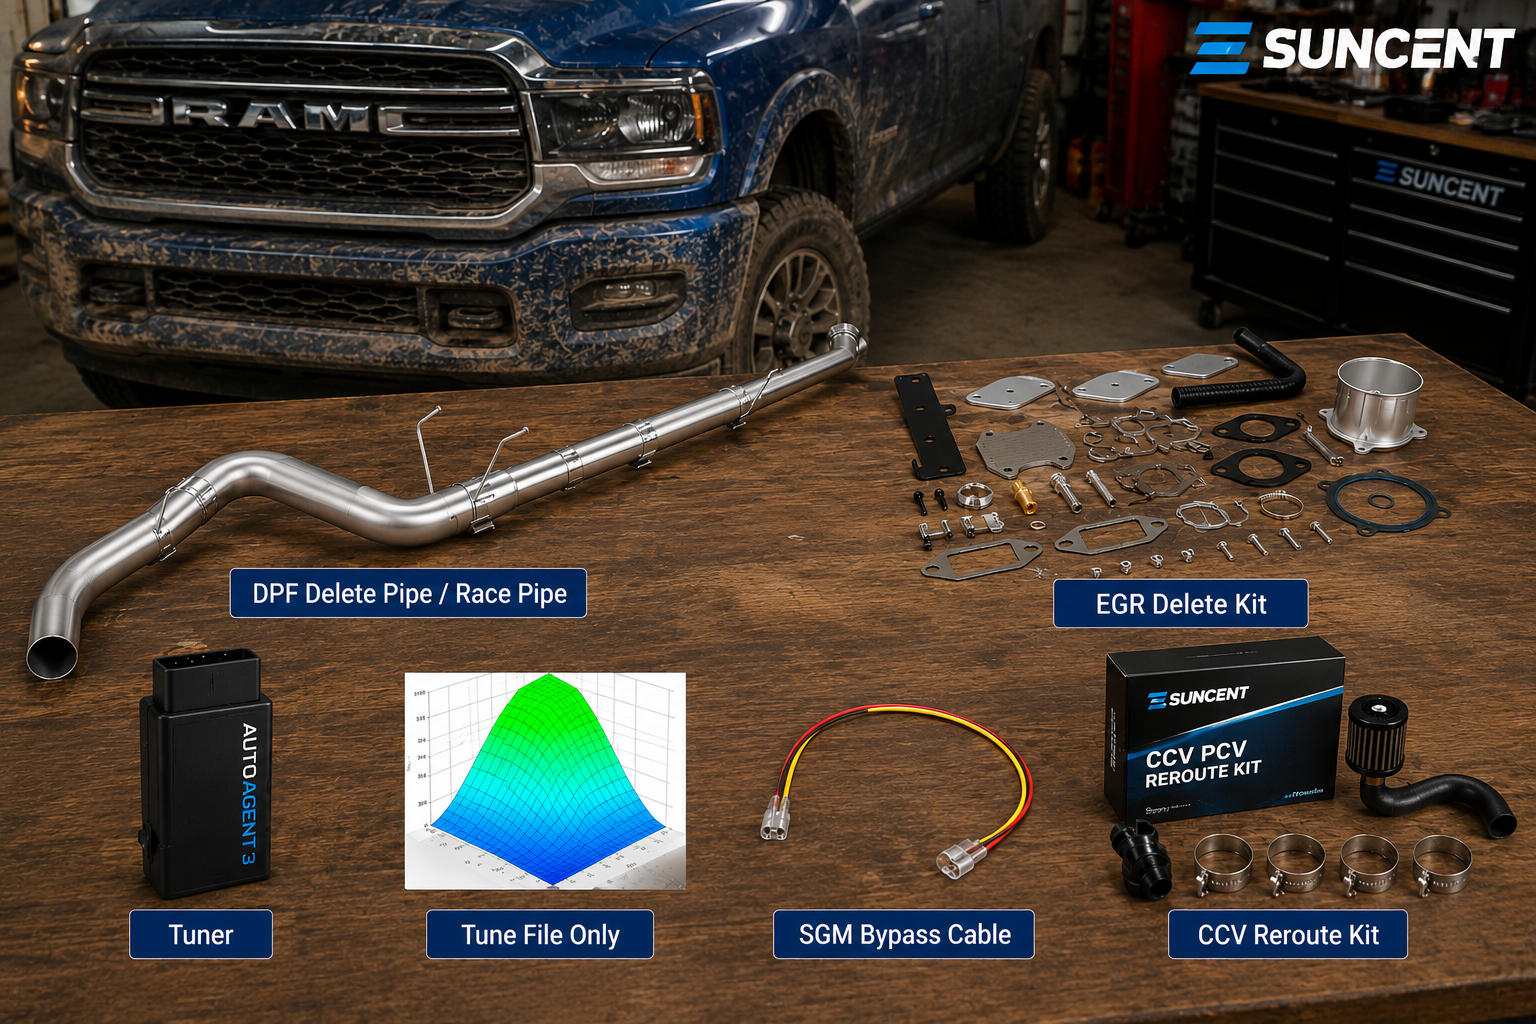
A complete 6.7 Cummins delete setup usually includes the following parts and tools:
| Category | Required? | Purpose |
|---|---|---|
| EGR Delete Kit | Required | Handles the EGR exhaust gas recirculation components |
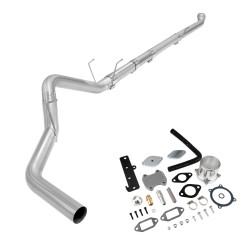
| Race Pipe / DPF Delete Kit / Downpipe-Back / Turbo-Back Exhaust | Required | Replaces the factory DPF/SCR exhaust components and improves exhaust flow depending on the level of modification |
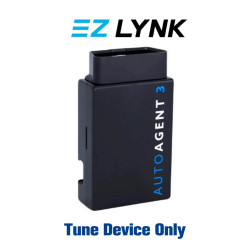
| Tuner | Required | Allows the ECU to match the modified hardware setup |
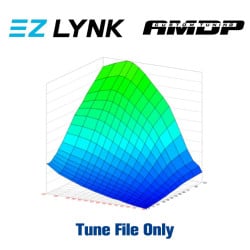
| Tuning Files | Required | Work with the tuner to complete vehicle calibration |
| SGM Bypass Cable | Usually required for 2018+ models | Allows the tuner to communicate with the vehicle computer |
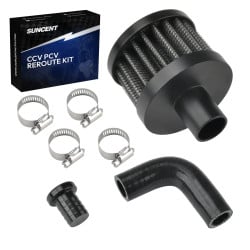
| CCV Reroute Kit | Optional | Helps manage crankcase ventilation vapors and keep the intake system cleaner over time |
| Installation Tools | Required | Used to remove rusted exhaust parts, secure new components, and inspect the installation |
If you are ready to choose a complete setup for your Ram 6.7 Cummins, you can start with SuncentAuto’s 6.7 Cummins delete kit page, then use the guide below to confirm your truck fitment, exhaust setup, tuning device, and installation preparation.
Before You Start: Confirm Your Truck, Parts, and Installation Requirements
The 6.7 Cummins covers a wide range of model years, and the emissions layout can vary by year and body style. This is especially important for Cab & Chassis models, which may use a different exhaust layout and certain EGR components compared with regular pickup models. It is not recommended to assume that a pickup kit will automatically fit a Cab & Chassis truck.
Before starting the installation, confirm the following:
- The correct model year, such as 2007.5–2012, 2013–2018, or 2019–2024/2025;
- The correct truck model, such as Ram 2500 / 3500 / 4500 / 5500;
- Whether the truck is a Pickup or Cab & Chassis model;
- Whether the exhaust size is 4 inch or 5 inch;
- Which exhaust setup you are using, such as a Race Pipe, DPF Delete Kit, Downpipe-Back Exhaust, or Turbo-Back Exhaust;
- Which EGR setup you are using, such as a Full Delete Kit or Block-Off Kit;
- Whether the tuner supports your model year and current modification setup;
- Whether the tune files are included or must be purchased separately;
- Whether a 2018+ model needs an SGM Bypass Cable;
- Whether you have new exhaust clamps ready;
- Whether you have a battery charger, floor jack, and jack stands;
- Whether you have penetrating oil ready;
- Whether you have read the matching installation instructions.
If any of these items are still unclear, stop and confirm fitment and parts completeness before beginning the installation. If you are not sure how to choose a complete setup, you can refer to this best delete kit for 6.7 Cummins guide.
6.7 Cummins Delete Kit Parts Checklist
6.7 Cummins EGR Delete Kit
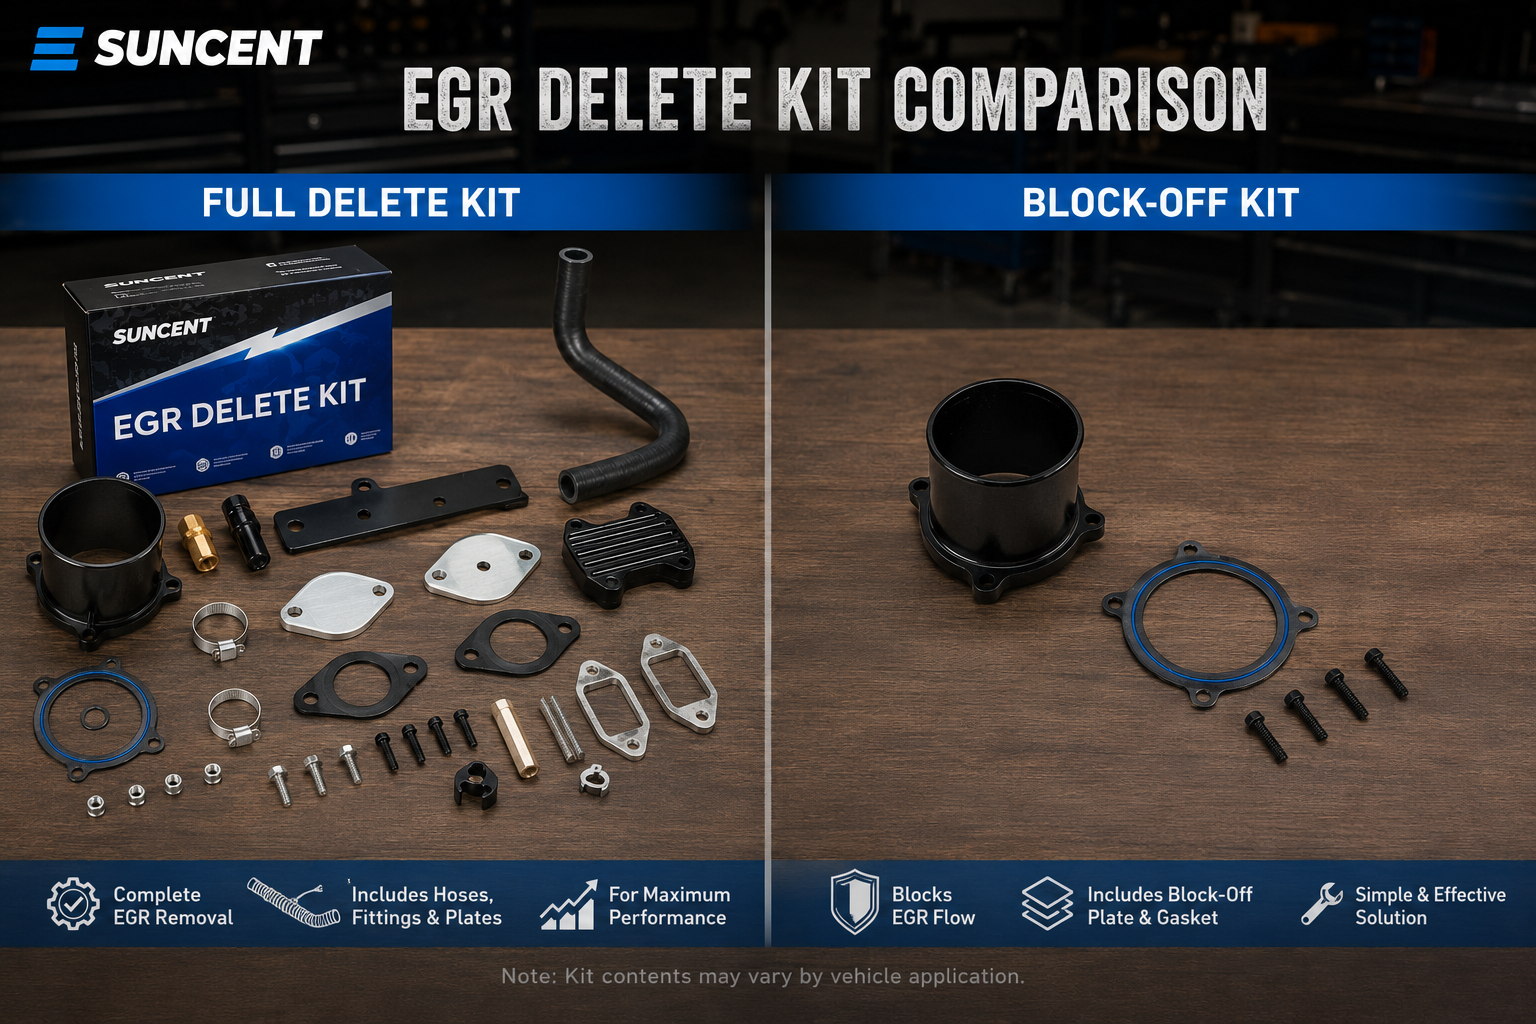
An EGR Delete Kit is used to address the exhaust gas recirculation system. Depending on how deep you want the modification to go, the two common options are a Full Delete Kit and a Block-Off Kit. To better understand how EGR modifications work on a 6.7 Cummins, you can read this 6.7 Cummins EGR delete guide.
Full Delete Kit usually includes coolant bypass hoses, fittings, brackets, gaskets, and block-off plates. It is a more complete solution, but it takes longer to install and requires careful handling of coolant draining and bypass hose sealing.
Block-Off Kit mainly uses block-off plates and gaskets to seal the exhaust gas passages. It is simpler to install and does not always require full EGR cooler removal. It is a better fit for owners who want to reduce installation complexity.
If you want a more complete long-term solution, a Full Delete Kit makes more sense. If you care more about installation speed, a Block-Off Kit is more straightforward.
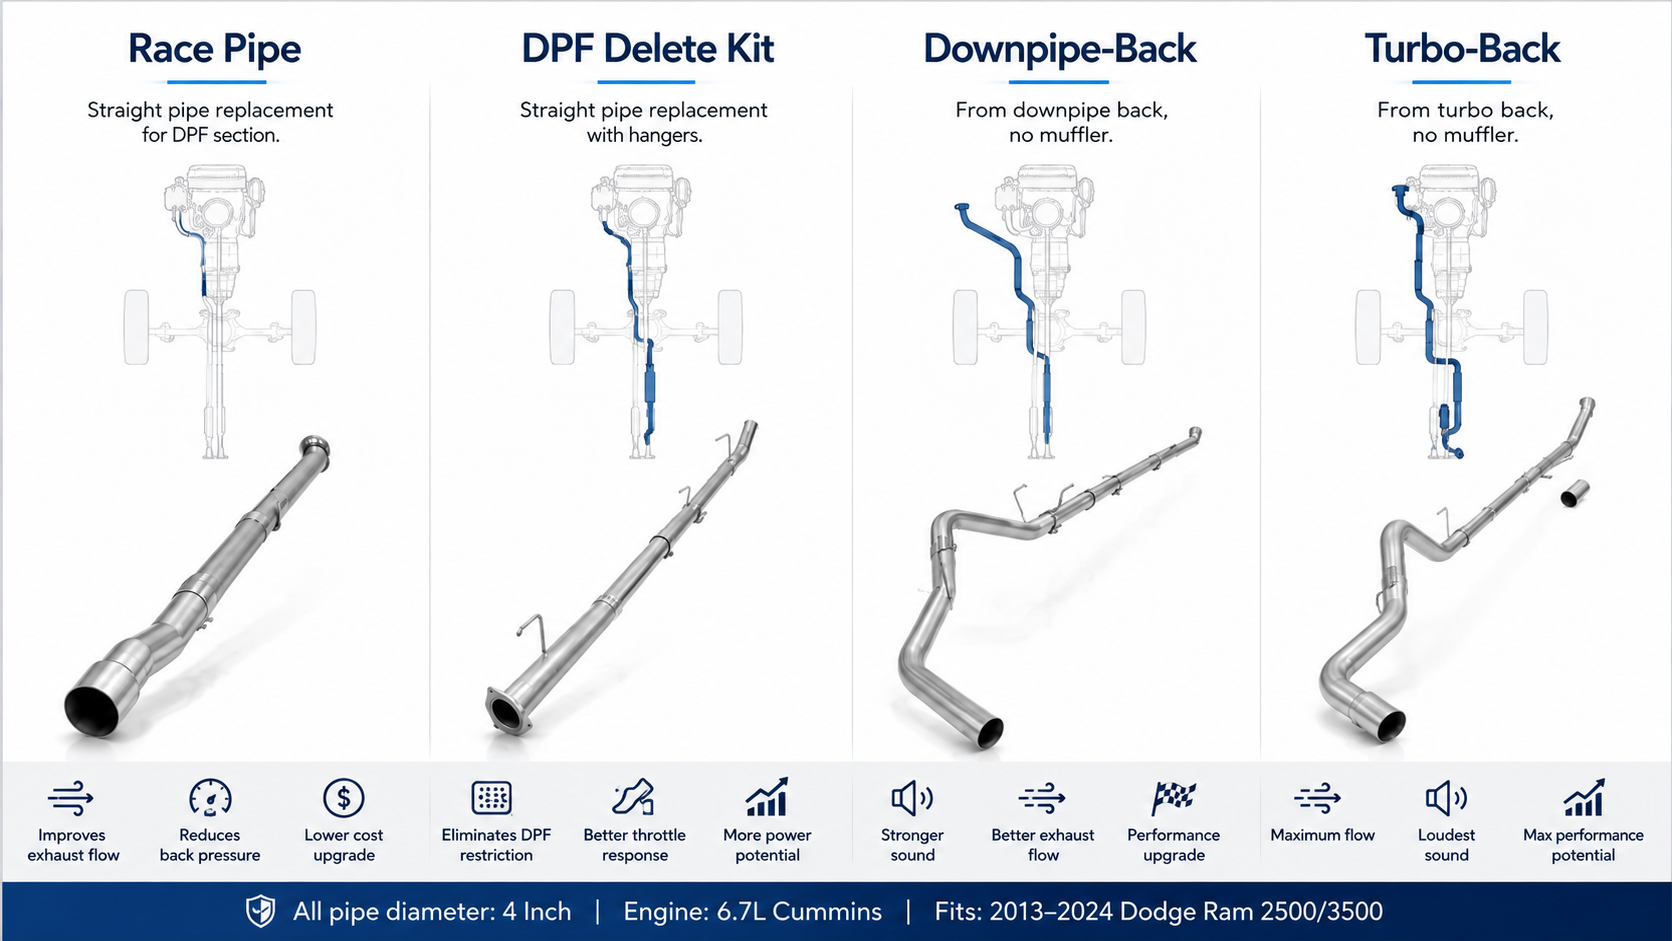
DPF Delete for 6.7 Cummins
DPF-related modifications come in several levels. The main differences are the replacement range, installation complexity, and exhaust flow improvement. If you want to compare DPF options for the 6.7 Cummins, you can start with this best 6.7 Cummins DPF delete kit buying guide.
| Type | Replacement Range | Best For |
|---|---|---|
| Race Pipe | Usually replaces the DPF canister while keeping part of the factory rear exhaust | Owners looking for a basic upgrade |
| DPF Delete Kit | Replaces the DPF/SCR-related mid-pipe or part of the rear exhaust | Owners who want a balance of cost, installation difficulty, and exhaust flow |
| Downpipe-Back Exhaust | Replaces the exhaust from behind the downpipe to the tail section | Owners who want to upgrade the mid-to-rear exhaust without replacing the downpipe |
| Turbo-Back Exhaust | Replaces the full exhaust system from behind the turbo outlet to the rear | Owners looking for a more complete upgrade in exhaust flow, sound, and performance potential |
A Race Pipe is the more basic replacement. A DPF Delete Kit works well for many owners who want to address factory exhaust restrictions. A Downpipe-Back Exhaust replaces a larger section and is better for upgrading the mid-to-rear exhaust. A Turbo-Back Exhaust is the most complete option, usually covering the exhaust path from behind the turbo outlet to the tail section, but it also requires more careful fitment and tuning compatibility.
You should also confirm the difference between 4 inch and 5 inch exhaust sizes. A 4 inch system is more common and easier to fit, while a 5 inch system is better suited for owners who want more exhaust flow and a more noticeable exhaust tone.
Tuner and Tuning Files
The tuner is what makes the entire 6.7 Cummins delete setup work properly. Hardware removal is only part of the job; the ECU also needs to be calibrated to match the new hardware configuration. If you want to compare tuning devices, you can read this best tuner for 6.7 Cummins with deletes guide, or view SuncentAuto’s diesel tuner .
If you are using an EZ LYNK system, remember that the EZ LYNK Auto Agent is the hardware device, while tuning files are the calibration files. They are usually sold separately. Buying only the hardware without the correct tuning files will not allow you to complete a full ECU flash. For more information about EZ LYNK fitment and use on a 6.7 Cummins, you can refer to EZ LYNK tuner for 6.7 Cummins.
Before ordering, confirm that the tuner supports your model year, whether the tuning files are included, whether the files match your EGR / DPF / exhaust setup, and whether the setup applies to a Pickup or Cab & Chassis model.
SGM Bypass Cable
For some 2018 and newer Ram models, an SGM Bypass Cable is an important part of the setup. Modern Ram trucks may use a Security Gateway Module that can limit communication between third-party devices and the vehicle computer.

If your truck requires an SGM Bypass Cable but you do not have one ready, the tuner may not be able to read, write, or communicate with the ECU correctly.
CCV Reroute Kit for 6.7 Cummins
A CCV Reroute Kit is an optional upgrade used to manage crankcase ventilation vapors and help keep the intake system cleaner over time. If you want to learn more about this system, you can read the 6.7 Cummins CCV delete guide.
It is not required to complete a DPF/EGR delete, but it is worth considering for owners who care about long-term maintenance, intake cleanliness, and oil vapor management. For the difference between CCV filter, reroute, and delete setups, you can also view the 6.7 Cummins CCV filter reroute delete guide.
Tools You Should Prepare Before Installation
Diesel truck exhaust modification is not just physical work. It also depends heavily on tool preparation. Rusted exhaust clamps, stuck hangers, and tight underbody space can all make the installation take longer than expected.
Power and Removal Tools
| Tool | Purpose |
|---|---|
| 3/8 inch Impact Wrench | Handles exhaust bolts and brackets in tight spaces |
| Air Hammer | Helps with rusted flanges, stuck hangers, and seized connectors |
| Hammer + Chisel | A backup option if you do not have an air hammer |
| Angle Grinder | Handles heavily rusted parts that cannot be removed normally |
| Ratchet and Wrench Set | Works on fasteners at different angles and sizes |
Exhaust-Specific Tools
| Tool / Supply | Purpose |
|---|---|
| Heavy-Duty Stainless Exhaust Clamps | Replaces factory clamps that may be damaged or deformed during removal |
| Penetrating Oil | Soaks rusted bolts in advance and helps reduce the risk of breaking them |
| Pry Bar | Helps remove rubber exhaust hangers |
| Exhaust Hanger Removal Tool | Makes exhaust hanger removal easier |
Safety and Support Equipment
| Tool | Purpose |
|---|---|
| Torque Wrench | Ensures clamps, block-off plates, and key fasteners are tightened to the correct torque |
| Floor Jack / Jack Stands | Supports the truck and heavy DPF/SCR components |
| Battery Charger | Keeps battery voltage stable during ECU flashing |
| Headlamp / Magnetic LED Light | Helps you see details inside the engine bay and under the truck |
| Drain Pan | Collects coolant during a Full EGR Delete |
It is recommended to spray penetrating oil on exhaust connections, clamps, hangers, and flange bolts 30–60 minutes before removal. This step is especially helpful for high-mileage trucks or vehicles from northern snow-belt states.
Recommended Installation Order
Specific steps can vary by model year, kit type, and tuning device. Always follow the matching product instructions. The order below is a practical overview for 6.7 Cummins owners.
Step 1: Confirm Before Starting
Check that all parts are complete, undamaged, and not missing any hardware. A video unboxing is recommended before installation.
Step 2: Connect SGM Bypass Cable if Required
If your truck requires an SGM Bypass Cable, connect it before tuner communication. For some 2018+ Ram models, this is required before the tuner can communicate properly with the vehicle computer.
Step 3: Complete Tuner Setup Before Hardware Removal
Before removing EGR, DPF, or SCR-related hardware, make sure the tuner and tuning files are ready and follow the correct guide to complete the required tuning process. Do not remove the hardware before handling the software, or the truck may trigger fault codes, reduced power, or drivability issues.
Refer to the following tuner installation guides:
If you want a more complete blog-style explanation, you can also refer to the Mini Maxx V2 installation guide and the EZ LYNK Auto Agent installation guide.
Step 4: Install the EGR Delete Kit
Installation difficulty depends on whether you are using a Full Delete Kit, a Block-Off Kit, or a Cab & Chassis-specific kit. A Full Delete Kit requires coolant draining, bypass hose installation, and careful fitting seal checks. A Block-Off Kit mainly focuses on block-off plates, gaskets, and fastener placement.
You can refer to the matching installation manual by model year:
- 2007-2009 6.7L Cummins EGR Delete Kit Installation Manual
- 2010-2025 6.7L Cummins EGR Delete Kit Installation Manual
- 2013-2024 6.7L Cummins EGR Delete Kit for Cab & Chassis Installation Manual
Step 5: Replace the Race Pipe / DPF Delete / Downpipe-Back / Turbo-Back Exhaust Components
When removing the factory DPF/SCR assembly, make sure it is supported by a floor jack or stand. When installing a Race Pipe, DPF Delete Pipe, Downpipe-Back Exhaust, or Turbo-Back Exhaust, use new heavy-duty stainless steel clamps and confirm the pipe angle, clearance, tailpipe position, and possible interference with the frame, driveshaft, suspension, or spare tire area before final tightening.
If you are installing a 4" Race Pipe, refer to these manuals:
- 2007.5-2012 6.7L Cummins 4" Race Pipe Installation Manual
- 2013-2018 6.7L Cummins 4" Race Pipe Installation Manual
- 2019-2024 6.7L Cummins 4" Race Pipe Installation Manual
If you are installing a 4"/5" Downpipe-Back Exhaust, refer to these manuals:
- 2013–2018 Cummins 4"/5" Downpipe-Back Exhaust Installation Manual
- 2019-2024 6.7L Cummins 4"/5" Downpipe-Back Exhaust Installation Manual
If you are installing a Turbo-Back Exhaust, follow the product page or the included instructions. Before installation, pay close attention to the downpipe area, turbo outlet connection, exhaust routing, clamp position, and tune file compatibility.
Step 6: Install the CCV Reroute Kit if Needed
If you choose to install a CCV Reroute Kit, it can be installed after the main exhaust and EGR components are completed. Make sure the hose routing is natural and does not contact hot exhaust parts or moving components.
Refer to this installation manual:
Step 7: Check DTCs, Leaks, and Final Fitment
After installation, use the tuner to check for abnormal DTCs. Then inspect the EGR block-off plate, coolant bypass hoses, exhaust clamp connections, exhaust pipe clearance, sensor plugs, and wiring locations.
If you notice fault codes, exhaust leaks, coolant leaks, or tuner communication problems, do not continue driving. Go back to the matching installation manual and check part placement, wiring connections, clamp sealing, and tune file compatibility.
How Long Does a 6.7 Cummins Delete Take?
Installation time depends on the truck year, rust level, kit type, and installer experience.
| Experience Level | Estimated Time | Notes |
|---|---|---|
| Experienced installer | 4–6 hours | Common when tools are ready and bolts are in good condition |
| Average DIY owner | 6–10 hours | More time is needed for tight spaces, clamps, and hangers |
| First-time installer | Plan for a full day | High-mileage or heavily rusted trucks can take longer |
| Full EGR Delete + Full Exhaust | A full day is safer | Involves coolant, exhaust work, and tuning |
The most time-consuming part is usually not installing the new parts, but removing the old factory hardware. Rusted clamps, deformed exhaust hangers, and hard-to-reach bolts can all add significant time.
Common Mistakes to Avoid
The most common installation problems usually come from the following issues:
- Buying only the tuner and forgetting to purchase or confirm the tuning files;
- Removing hardware before tuning, causing the ECU and hardware setup to mismatch;
- Forgetting the SGM Bypass Cable on 2018+ models;
- Reusing damaged, rusted, or deformed factory exhaust clamps;
- Removing the DPF/SCR assembly without a floor jack or stand for support;
- Flashing the ECU without a stable battery charger connected;
- Failing to distinguish between Pickup and Cab & Chassis models.
Most of these problems can be avoided before installation. Confirm fitment, parts, tuning files, and tools before you start taking the truck apart. For issues caused by removing hardware without tuning first, refer to EGR/DPF delete without tuner consequences.
Notes and Disclaimer
All delete kits and related performance modification parts are intended for racing, competition, or off-road use only. Installing these products may cause the vehicle to no longer comply with local emissions regulations and may affect warranty, inspection, or registration eligibility. Before purchasing or installing, confirm the regulations in your local area. For more information, refer to is EGR delete legal? and is it legal to delete a diesel now?.
Stable battery voltage is critical during ECU flashing. It is recommended to connect a stable 10-amp battery charger to avoid a flash interruption caused by voltage drops. For more tuner-related issues, see the Mini Maxx V2 problems and troubleshooting guide.
After the modification is complete, use the tuner to check for abnormal DTCs. For a Full EGR Delete setup, also confirm the coolant lines, bypass fittings, and sealing points to prevent leaks caused by loose installation.
A Note to Readers
Modification is a journey toward better performance. As we always say, the more you understand the technology, the better you can enjoy the drive. Now your truck is ready to hit the road in its lighter, cleaner state. If you have any installation tips or run into an interesting removal challenge, feel free to share your experience with the SuncentAuto community.